The Future of Internet of Things

The tech world we’ve all been dreaming of has finally arrived, it’s smart and full of “things”, the Internet of Things. According to statistics, there are 26.66 billion devices connected to IoT worldwide. Which statistically leaves all citizens of the world with at least 3 devices.

The number of the Internet of Things is projected to grow to 75 billion devices by 2025. But with all these mind-boggling numbers, only 0.06% of the “things” that could be connected to the internet actually are. This leaves a lot of space and potential for the development of the Internet of Things. The future of IoT looks quite promising. They already impact our lives, homes, cities we live in, how we work, travel, or interact with the world around us.

It is projected to become the world’s largest device market, adding $ 1.7 trillion in value to the global economy in the next two years. But what does this emerging industry mean for the future of your organization?

Internet of Things technologies will lead to a number of innovations that will have a significant effect on companies of all sizes and industries, including:

Greater efficiency for business operations: Connected devices will enable companies to leverage data to improve their efficiency and effectiveness.

New business models and revenue streams – New processes will speed time to market and respond more quickly to customer needs.

Global visibility – Large companies will be able to better track efficiency across multiple locations and across the supply chain.

Stronger cybersecurity – More data means greater potential for cybercriminals to steal sensitive business information.

The future of IoT is bright and it is rapidly evolving from a technology experiment to a strategic imperative.

Connecting ESP32 to thethings.iO using MQTT

In this post we will explain how to connect and ESP-32 to thethings.iO platform through and ESP-32 from Espressif. Keep in mind that the project used as an example could be found in our 

repo:  https://github.com/theThings/ESP32_MQTT

Let’s go!

First of all, take a look on the requirements (for more explanations you can visit our previous blog post HERE https://blog.thethings.io/http-integration-with-esp32-s2/

  • Java SE (11 or higher) 
  • Python (3.5 or higher). Otherwise, install the most recent version by clicking on each of the links.
  • ESP-IDF Tools Installer 
  • Eclipse IDE for C / C ++ Developers package with the necessary plugin that can be found here.
  • Git version manager, install the most recent version by clicking on the link. Once installed, clone the ESP-IDF 4.2 repository where the ESP32-S2 module libraries are located (here).

With all the needed software installed we can start to play with the ESP-32 and thethings.io platform:

Take the ESP32-S2-Saola-1 kit from Espressif and connect it via USB to the terminal. From here, you can:

  1. Create a project.
  2. Create a project with a template.
  3. Open a project.

CREATE A PROJECT

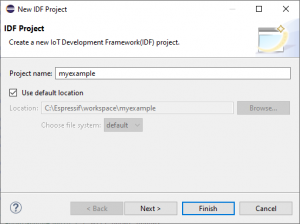
Projects are easily created by selecting the File> New> Espressif IDF Project tab. Enter the name and click Finish.

CREATE A PROJECT WITH TEMPLATE

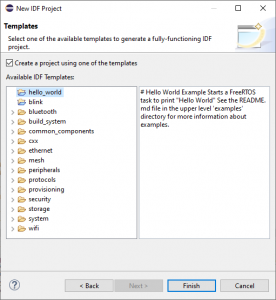
Template projects are the best option for both novice users, who want to discover first-hand the potential of the ESP32-S2, as well as experts or professionals, who appreciate having  parts of the code already made to quickly move to the testing phase.

CREATE A PROJECT WITH TEMPLATE

Template projects are the best option for both novice users, who want to discover first-hand the potential of the ESP32-S2, as well as experts or professionals, who appreciate having  parts of the code already made to quickly move to the testing phase.


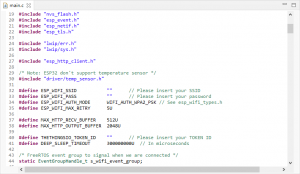
Before compiling, the user needs to fill in three code definitions. From the project explorer window (located on the left of the screen) locate and open the main file, main.c. Definitions are at the beginning.

Write the identifier and password of the Wi-Fi from which you want to make the connection and the token number assigned to the thing, which will be responsible for storing the samples received by MQTT. Note: if the Wi-Fi does not have a password, leave the space empty (“”).

New users of the Thethings.io platform who need to create an account can do so at https://thethings.io and follow the steps. After registration is complete, create a new IoT product through the Things Manager screen and select JSON as the product type.

Once the main.c file has been modified, click on the hammer icon (above the project explorer) to compile. Verify that the process has finished without errors or warnings.

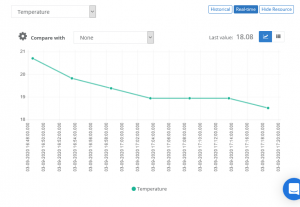
Next, start recording the kit by clicking on the play icon (located next to the hammer). Once completed, you can see from the Things Details screen how a temperature record has been created, which will be updated every 5 minutes.


Optionally, the application can be tracked via USB by opening the terminal window. Select the Window> Show View> Terminal. A new window will appear with various icons in the upper right. Click the first at all (the one that looks like a screen). A new configuration window will appear. Select the port to which the kit is connected and leave the rest of the default values. Click OK to start communication.

Use thethings.iO, the simplest enterprise IoT platform. If you have any doubts please contact us at hello@thethings.io


Retail digital transformation in Covid Times

Right now, a consequence of the Covid-19 pandemic, it has presented companies with a sudden paradigm shift in which digital transformation has experienced exponential growth and technology plays an even more fundamental role in managing this complex context. The technology companies also have to serve to give us solutions to struggle against Covid.

There are solutions that allow us to understand the progression of mobility applied both to this sector and to those in which customer service or points of sale are essential, whether they are bank branches, service stations, supermarkets, pharmacies, distribution chains or department stores. 

The information offered helps the client, for example, to adapt the product offer because he knows the profile of the people who pass through his space, stop at the window and enter. That is, you could tailor the storefront offering to the interests of your target audience (for example, women ages 30-45)…

Furthermore, with this solution, the companies will not only understand the new mobility patterns of the users, but will also compare that mobility and the behavior of potential clients in different periods of time: during and in the current stage after Covid-19 or in the new normal to be able to change their strategy and be able to control the capacity in their stores or spaces.


HTTP integration with ESP32-S2

We started a new stage with great enthusiasm and new projects…keep you posted! 🙂

We are working on a new generation of content, we hope you like it!

Let’s start with a juicy snack: how to connect your ESP32-S2- based devices to thehtings.io via HTTP.

You, our devoted followers and valued customers, you are our biggest value. We will be delighted to listen to you: share your ideas and topics you would like us to write about at hello@thethings.io

We will try to carry them out as much as possible.

And without further ado … let’s get started!


Check out our repo:  https://github.com/theThings/ESP32_HTTP

In this post we will explain how to connect via HTTP to the Thethings.io platform through ESP32-S2. A high-performance IoT module, with which the Chinese giant Espressif will try to reduce the TTM (time to market) of the new IoT products that are yet to come.

Step by Step tutorial

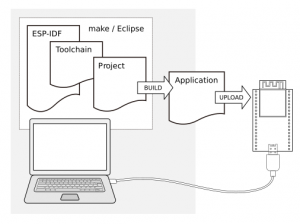
First of all, check that the terminal has Java SE (11 or higher) and Python (3.5 or higher). Otherwise, install the most recent version by clicking on each of the links.

Download the ESP-IDF Tools Installer package that contains the essential tools for programming and debugging the ESP32-S2. To avoid problems, it is recommended that you install in an address that does not contain blank spaces.

Next, install the Eclipse IDE development environment (version 2020-06 CDT). Download the Eclipse Installer program (here) and install the Eclipse IDE for C / C ++ Developers package. Note: do not change the default address to avoid problems.

If you don’t have the Git version manager, install the most recent version by clicking on the link. Once installed, clone the ESP-IDF 4.2 repository where the ESP32-S2 module libraries are located (here).

From the Eclipse IDE program, first install the plugin, and then the tools. Instructions can be found here.

Take the ESP32-S2-Saola-1 kit from Espressif and connect it via USB to the terminal. From here, you can:

  1. Create a project.
  2. Create a project with a template.
  3. Open a project.

CREATE A PROJECT

Projects are easily created by selecting the File> New> Espressif IDF Project tab. Enter the name and click Finish.

CREATE A PROJECT WITH TEMPLATE

Template projects are the best option for both novice users, who want to discover first-hand the potential of the ESP32-S2, as well as experts or professionals, who appreciate having  parts of the code already made to quickly move to the testing phase.


Select the File> New> Espressif IDF Project. Give the project a name and click Next>. Mark the top checkbox and choose one of the many examples available. Note: some only work for ESP32, which is the pre-ESP32-S2 chipset.

OPEN A PROJECT

Thethings.io has created a sample project (ttio_http_client) to show platform users how to use the ESP32-S2-Saola-1 kit to take temperature samples and upload them to the cloud via HTTP protocol. To download it click here https://github.com/theThings/ESP32_HTTP. Note: It is important to save the project in the folder configured as a workspace in the Eclipse IDE.

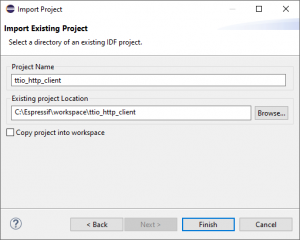
Once downloaded select File> Import…. A new window will appear. Select the option Espressif / Existing IDF Project and click Next>. Indicate the location and click Finish.

Before compiling, the user needs to fill in three code definitions. From the project explorer window (located on the left of the screen) locate and open the main file, main.c. Definitions are at the beginning.

Write the identifier and password of the Wi-Fi from which you want to make the connection and the token number assigned to the thing, which will be responsible for storing the samples received by HTTP. Note: if the Wi-Fi does not have a password, leave the space empty (“”).

New users of the Thethings.io platform who need to create an account can do so at https://thethings.io and follow the steps. After registration is complete, create a new IoT product through the Things Manager screen and select JSON as the product type.

Once the main.c file has been modified, click on the hammer icon (above the project explorer) to compile. Verify that the process has finished without errors or warnings.

Next, start recording the kit by clicking on the play icon (located next to the hammer). Once completed, you can see from the Things Details screen how a temperature record has been created, which will be updated every 5 minutes.

Optionally, the application can be tracked via USB by opening the terminal window. Select the Window> Show View> Terminal. A new window will appear with various icons in the upper right. Click the first of all (the one that looks like a screen). A new configuration window will appear. Select the port to which the kit is connected and leave the rest of the default values. Click OK to start communication.

Use thethings.iO, the simplest enterprise IoT platform. If you have any doubts please contact us at hello@thethings.io


Webinar with Sigfox: Learn how to connect a Sigfox Device at thethings.iO IoT Platform

Last week our CEO Marc Pous was invited to make a webinar at the Sigfox Webinar Series. Marc showcased in about 30 minutes how to connect a really simple Sigfox device to thethings.iO. During the webinar Marc explained how to do Sigfox parsers, dashboards, alerts and jobs on Cloud Code. Feel free to watch it here:

Find here the slides that Marc presented during the webinar:

All the code of the webinar is here.

Probably one of the most interesting part of the video was the Q&A at the end of the webinar. Nevertheless if you have a Sigfox project, feel free to contact us and we will gladly help you to succeed with thethings.iO IoT platform.

Blockchain and Internet of Things

Internet of Things and Blockchain or Blockchain and Internet of Things. These are two hot topics thrown around the industry a lot, but what exactly do they mean and how are they related?

What is the Internet of Things

Internet of Things (IoT) is, simply put, the connection of physical objects, or “things”, to the Internet. Hence, these “things” are able to send and receive data. Maybe this seems like a foreign concept, but in reality most households with broadband connection have IoT-connected devices already, and the number is only continuing to grow. From smart locks, to self-adjusting thermostats, IoT is already here to make our lives more convenient. Its use-cases even extent beyond that, as IoT can be used for smart city concepts, supply chain management, manufacturing, and much more. thethings.iO, in fact, provides a sophisticated, easy-to-use platform for companies or individuals to connect their IoT devices.

IoT has incredible growth potential, but it does have some kinks that need to be worked out. The chief among them: Security. IoT devices are generally more susceptible to hacking than smartphones and other endpoint devices due to their more limited functionality. When considering devices like smart locks for home safety, or even self-driving cars, it is clear that user safety–and privacy–should be paramount.

Blockchain

Blockchain, or Distributed Ledger Technology (DLT for short). Many people think of Blockchain as Bitcoin. However, this is a misconception: Blockchain is the technology behind Bitcoin and other cryptocurrencies, it is what makes them work. To explain, the blockchain is a series of “blocks” of information (in the case of Bitcoin, transaction data) linked together via cryptographic hashes. A distributed network of nodes (nodes generally being the computers of the blockchain users) each has a local copy of the blockchain, and the nodes verify new blocks by reaching a consensus, usually a majority. Hence, blockchain is a public ledger of information verified collectively. The kicker of blockchain is that there is no central authority verifying the ledger (i.e. banks when thinking about bitcoin and transactions).
Because of how it works, blockchain is inherently immutable (or unchangeable), transparent, and secure, as changing it requires the consensus of a distributed network of nodes. In other words, to hack a blockchain, you would have to simultaneously hack a huge network of individual records as opposed to hacking a single, centralized database.

How IoT platforms can help here?

Nowadays (2019) there are still not a lot of Blockchain (DLTs) as a service systems. Actually scaling a Blockchain service is still tricky. An IoT platform such as thethings.iO is working as a service in several projects such as the tracking coffee project and more. Our goal for 2020 is to offer Blockchain services to our customers in case it is needed on their use case.

Integrating Blockchain technology into IoT has huge ramifications as the data sent by IoT-connected devices could be stored in a decentralized ledger in a way that ensures security, transparency and privacy. In fact, many of the security shortcomings of present-day IoT may be overcome with DLT’s inherent transparency and immutability.

Additionally, it is important to address user privacy. While blockchains like Bitcoin are public DLT, there are other types. When working with customers, private blockchains accessible to specific people may be more useful by restricting access. Moreso, different groups of people can be given different permissions: For example, group A may be able to view a blockchain, group B may manipulate certain aspects of the data being sent, and group C may simply have no access at all. Furthermore, blockchains can be constructed with anonymity such that user identity is ambiguous–enhancing privacy. Our key point: The flexibility of blockchains allow for greater control over user data privacy.

The Internet of Things is only getting bigger, and as agriculture, connected homes, asset tracking, smart cities and more become more of a reality. With great potential comes greater risk -and this is exactly why Blockchain’s use case for IoT technology should be fully researched.

Here at thethings.iO IoT platform, we are doing just that. We are constantly thinking about how we can improve security for our customers, and if Blockchain could be used in a way that provides greater transparency for the data that we provide. If you have any questions or comments, feel free to reach out to us. We would love to hear your thoughts on this exciting field of new tech!

PD: This is a blogpost written by Kieffer Gilman-Strickland during his internship at thethings.iO.

Work with ComputedLocation and visualize on a map your Sigfox devices

Locate assets it is key in some use cases. This is why Sigfox is improving their techniques to locate assets. Sigfox brings the Atlas geolocation, which is kind of the GSM cell tower triangulation with Sigfox base stations. The Sigfox Atlas location from the new API version on the DATA ADVANCED services uses the concept of computedLocation. At thethings.iO sigfox parser on Cloud Code it is very simple to parse the Sigfox computedlocation.

Sigfox made a smart movement using machine learning techniques in order to calculate location of assets with Sigfox base station triangulations. In case of base stations dense locations, the computedLocation can be “kind of” precise (about 1KM). However in places with not a lot of Sigfox base stations, it’s possible that the computedLocation error brings about 10 or 15 kms or error.

How Sigfox computedLocation works

In case that you have the Sigfox Atlas location activated on your Sigfox contract, then you can introduce a DATA_ADVANCED callback. The computedLocation structure is a JSON object and it looks like this:

{
"lat":23.783814666368414,
"lng":2.1434994169512827,
"radius":8869,
"source":2,
"status":1
}

This is the structure of the computedLocation JSON:

  • The lat is the latitude and the lng is the longitude.
  • The radius means the distance in meters that potentially the device really is located from the latitude and longitude computed. Understand the radius as the aproximate error on the location detected.
  • The source indicates the source of the location computed, if it’s Atas, WiFi or GPS. If the source is set to 0 the location is computed by legacy mode using RSSI and position of the Sigfox base station. If the source is set to 1 the location is computed using the GPS inside the data payload on the uplink. If the source is set to 2 the location is computed by Atlas Network. If the source is set to 3 the location is computed by Atlas POI and 4 by Atlas HD.
  • The status is set to 1 when a position has been computed and 0 when no position has been computed.

How to visualize computedLocation on a thethings.iO map

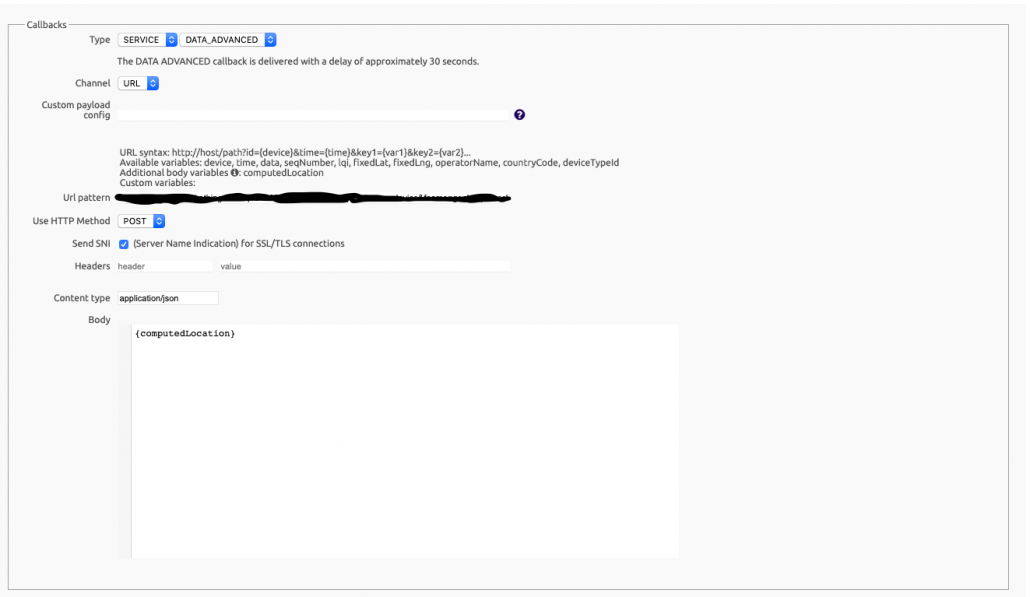
First of all, it is important to set up a SERVICE and DATA ADVANCED callback on the Sigfox backend.

Once there introduce thethings.iO Sigfox callback URL available on your product details and paste it there as a POST callback. Usually thethings.iO Sigfox Callback URL looks like this: https://subscription.thethings.io/sgfx/[your ID]/[your hash]?id={device}&data={data}&snr={snr}&station={station}&avgSnr={avgSnr}&rssi={rssi}&seqNumber={seqNumber}

Delete some parameters and leave it like this: https://subscription.thethings.io/sgfx/[your ID]/[your hash]?id={device}

Then paste the URL on the URL pattern and go to the Body and introduce {computedLocation}. Just like the image below.

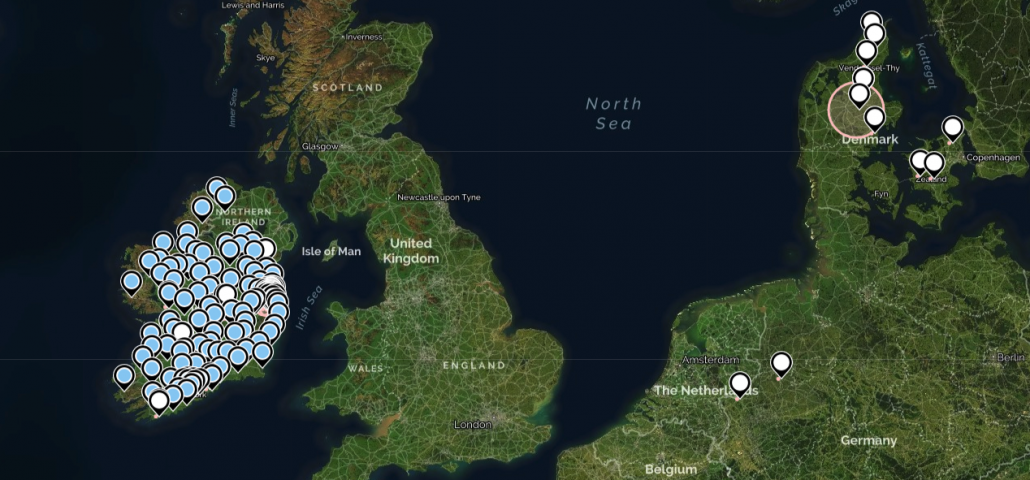
At this moment, every time there is a message from your Sigfox device, thethings.iO will receive automatically the computedLocation by Sigfox. To make it easy we automagically store all the JSON object from Sigfox at the device as a resource, so you can see the latitude and longitude plus the radius, status and source. It’s simple!

At this point you can start playing with the dashboards from thethings.iO IoT platform. thethings.iO is the most simple enterprise IoT platform, so feel free to test it during 15 days here.

PERSOSER project – The personalisation of the services for the improvement of the User Experience with IoT

Since last year thethings.iO takes part of the consortium of the PERSOSER project. The PERSOSER (Personalització de serveis per la millora de l’experiència del client) is a Catalan R&D project leaded by the RIS3CAT Utilities 4.0 community in Catalonia. The project started on March 2018 and will finish on March 2021.

The main goal of the project is to create dynamical and personalized services por Utilities customers with customer engagement and an improved User Experience with technologies such as the Internet of Things, Machine Learning and more. The integration, exploitation and filtering of heterogeneous data will be key in order to obtain new results from Utilities data. And collaborative design of advanced and personalized services depending on the specific needs of customers. All of these with pilots and tests running with IoT devices and thethings.iO IoT platform.

At thethings.iO we will focus our efforts as well on the Connected Home new services and business models that will appear in the near future. Our goal will be to design and test new services tailored to each client integrated on their home to increase awareness and transparency.

The partners working on the project are Bemobile, Cetaqua (Suez), Dexma, Eurecat, I2Cat and thethings.iO.

The PERSOSER project (COMRDI16-1-0058) has been financed by the European Union through the European Regional Development Fund, ERDF, with the support of ACCIÓ – Government of Catalonia.

At thethings.iO we are open to participate in any kind of R&D European or National project. Feel free to contact us.