HTTP integration with ESP32-S2
We started a new stage with great enthusiasm and new projects…keep you posted! 🙂
We are working on a new generation of content, we hope you like it!
Let’s start with a juicy snack: how to connect your ESP32-S2- based devices to thehtings.io via HTTP.
You, our devoted followers and valued customers, you are our biggest value. We will be delighted to listen to you: share your ideas and topics you would like us to write about at hello@thethings.io
We will try to carry them out as much as possible.
And without further ado … let’s get started!
Check out our repo: https://github.com/theThings/ESP32_HTTP
In this post we will explain how to connect via HTTP to the Thethings.io platform through ESP32-S2. A high-performance IoT module, with which the Chinese giant Espressif will try to reduce the TTM (time to market) of the new IoT products that are yet to come.
Step by Step tutorial
First of all, check that the terminal has Java SE (11 or higher) and Python (3.5 or higher). Otherwise, install the most recent version by clicking on each of the links.
Download the ESP-IDF Tools Installer package that contains the essential tools for programming and debugging the ESP32-S2. To avoid problems, it is recommended that you install in an address that does not contain blank spaces.
Next, install the Eclipse IDE development environment (version 2020-06 CDT). Download the Eclipse Installer program (here) and install the Eclipse IDE for C / C ++ Developers package. Note: do not change the default address to avoid problems.
If you don’t have the Git version manager, install the most recent version by clicking on the link. Once installed, clone the ESP-IDF 4.2 repository where the ESP32-S2 module libraries are located (here).
From the Eclipse IDE program, first install the plugin, and then the tools. Instructions can be found here.
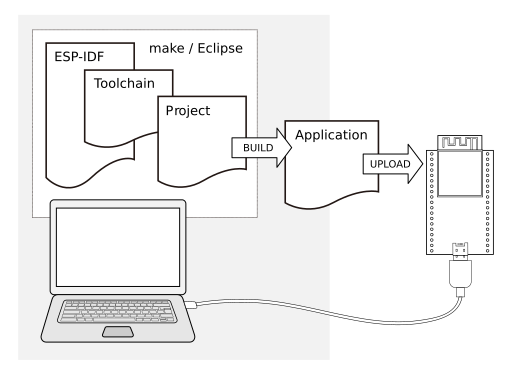
Take the ESP32-S2-Saola-1 kit from Espressif and connect it via USB to the terminal. From here, you can:
- Create a project.
- Create a project with a template.
- Open a project.
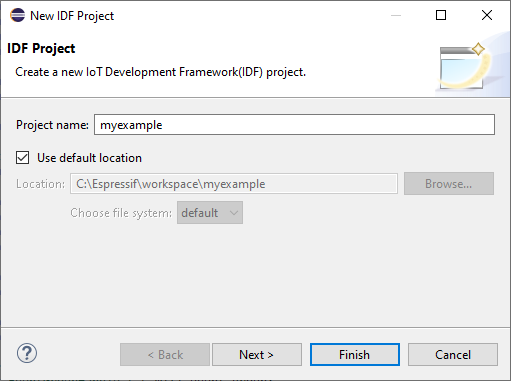
CREATE A PROJECT
Projects are easily created by selecting the File> New> Espressif IDF Project tab. Enter the name and click Finish.
CREATE A PROJECT WITH TEMPLATE
Template projects are the best option for both novice users, who want to discover first-hand the potential of the ESP32-S2, as well as experts or professionals, who appreciate having parts of the code already made to quickly move to the testing phase.
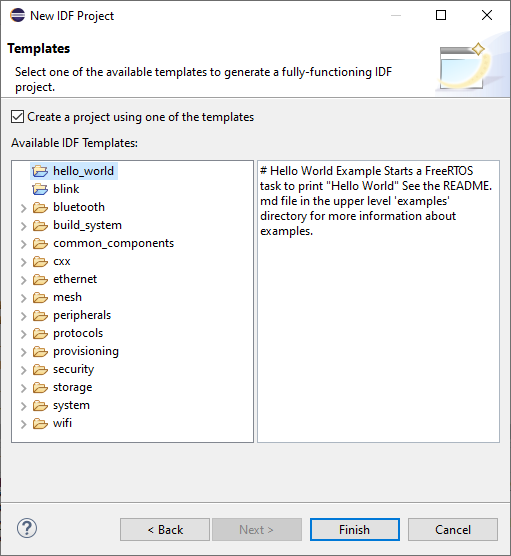
Select the File> New> Espressif IDF Project. Give the project a name and click Next>. Mark the top checkbox and choose one of the many examples available. Note: some only work for ESP32, which is the pre-ESP32-S2 chipset.
OPEN A PROJECT
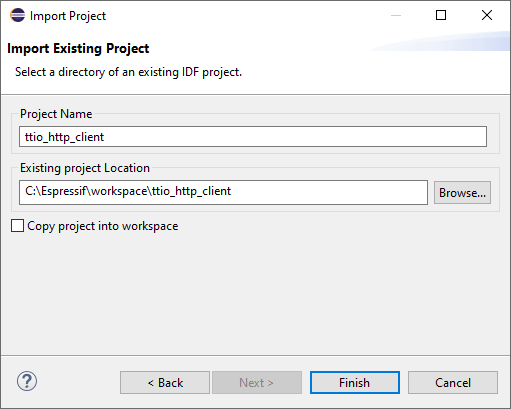
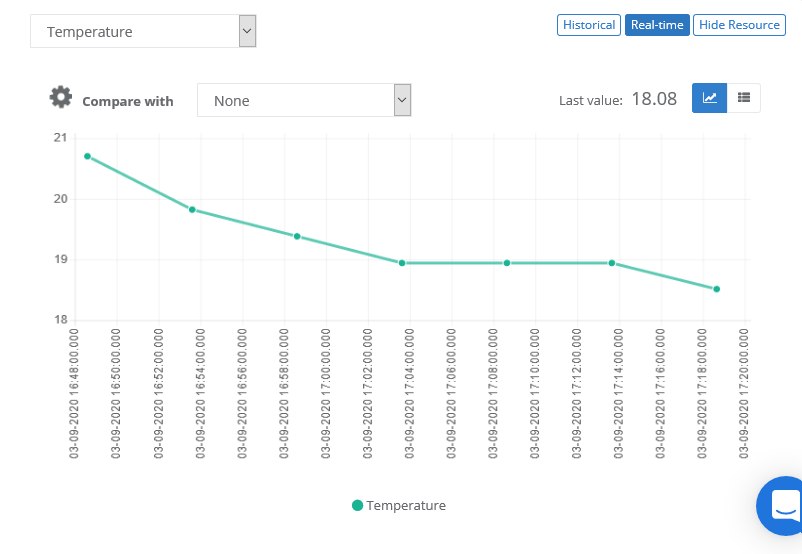
Thethings.io has created a sample project (ttio_http_client) to show platform users how to use the ESP32-S2-Saola-1 kit to take temperature samples and upload them to the cloud via HTTP protocol. To download it click here https://github.com/theThings/ESP32_HTTP. Note: It is important to save the project in the folder configured as a workspace in the Eclipse IDE.
Once downloaded select File> Import…. A new window will appear. Select the option Espressif / Existing IDF Project and click Next>. Indicate the location and click Finish.
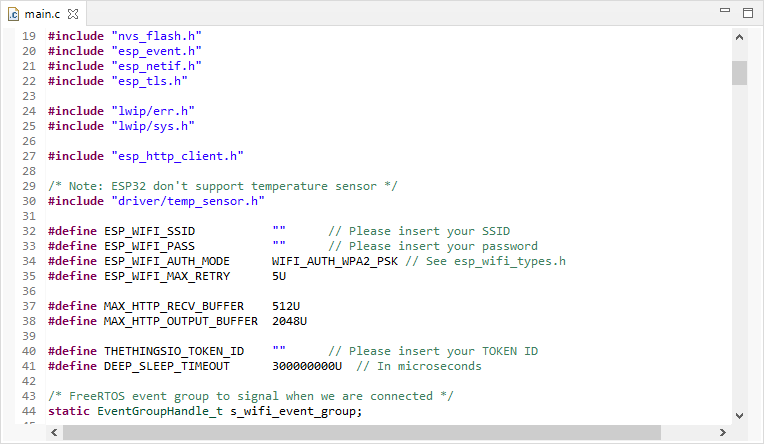
Before compiling, the user needs to fill in three code definitions. From the project explorer window (located on the left of the screen) locate and open the main file, main.c. Definitions are at the beginning.
Write the identifier and password of the Wi-Fi from which you want to make the connection and the token number assigned to the thing, which will be responsible for storing the samples received by HTTP. Note: if the Wi-Fi does not have a password, leave the space empty (“”).
New users of the Thethings.io platform who need to create an account can do so at https://thethings.io and follow the steps. After registration is complete, create a new IoT product through the Things Manager screen and select JSON as the product type.
Once the main.c file has been modified, click on the hammer icon (above the project explorer) to compile. Verify that the process has finished without errors or warnings.
Next, start recording the kit by clicking on the play icon (located next to the hammer). Once completed, you can see from the Things Details screen how a temperature record has been created, which will be updated every 5 minutes.
Optionally, the application can be tracked via USB by opening the terminal window. Select the Window> Show View> Terminal. A new window will appear with various icons in the upper right. Click the first of all (the one that looks like a screen). A new configuration window will appear. Select the port to which the kit is connected and leave the rest of the default values. Click OK to start communication.
Use thethings.iO, the simplest enterprise IoT platform. If you have any doubts please contact us at hello@thethings.io

