Partnership integration announcement

We are pleased to announce that we are starting 2021 strong and adding more and more features to the platform. In this case it is about integration with The Things Stack, a LoRaWAN platform that is actively maintained by The Things Industries. With this integration, IoT project developers will be able to create their projects with the thethings.iO dashboard in a simple and effective way through a simple configuration of an endpoint in the panel.

The Things Industries is a long-standing and internationally recognized LoRaWAN connectivity and service provider, with a global installed base of more than 18,000 gateways, more than 100,000 users and more than 200 B2B clients using The Things Industries as the basis  for their IoT projects with LoRaWAN.

The Things Industries is a leader in the global ecosystem and with its technology, the complexities of development for LoRaWAN networks are eliminated, in addition to allowing integration and interoperability throughout the supply chain and reducing the TCO of projects with this communications technology.

Through the integration of The Things Stack and thethings.iO, an association is created in the form of a partnership that offers a very powerful solution and great flexibility both in monitoring and in the creation of complex IoT networks and a real solution for real IoT projects. Where the user / developer has a world of possibilities to grow their business and service as far as their imagination can encompass.

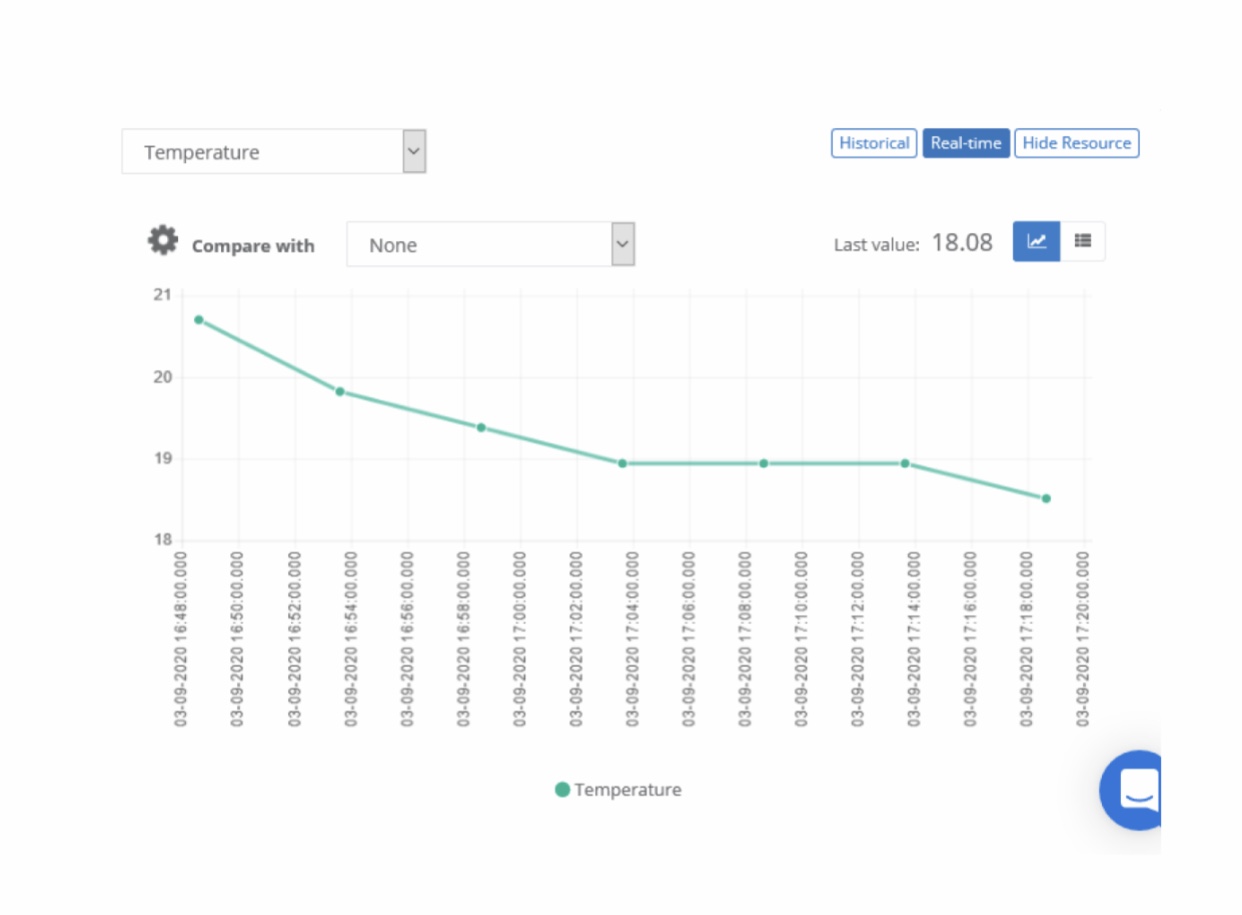
At thethings.iO we continue working to add functionalities and integrations that help IoT application developers to carry out their projects regardless of the communications technology they use.

IoT in Livestock

One of the dilemmas we face today is sustainability in the food production system, both precision agriculture and the use of technology in livestock will be key to the objective of increasing the production of healthy foods with a minimum environmental impact.

The main advantage of the IoT application in livestock is the improvement in the control and management of animals and their production. But if their physical condition and the living conditions of the animals and the environmental variables of the farms are controlled, a product of better quality and greater traditional value can be offered.

IoT devices can help monitor the health of animals, monitoring their vital signs, the kilometers they travel, or even the ideal moment for their mating. Thus, a sensor that does not register any movement for a long time can indicate that the animal is sick or has suffered an accident.

Transport is also a task that represents a great risk for the welfare of the animals, having to pay special attention to variables such as temperature or weather conditions.

Another use of the IoT in livestock is the geolocation of livestock in real time using GPS sensors installed in collars or other devices. It is a very useful use within extensive livestock farming developed in large areas of land where animals move freely.

Also its usefulness in the monitoring of the cold chain, whose maintenance is essential throughout the supply channel.


Smart Homes

The era of digitalization applied to smart homes and smart buildings allows, through the information collected, to make decisions and at the same time control remotely.

This can offer you greater comfort and safety in your day to day. Whether it’s sensor lights that save you money on energy bills or security systems that you can control from thousands of miles away.

Intelligent home and building automation systems provide centralized control of a building’s heating and cooling systems, lighting, entry access, and other capabilities through a building management system.

It should be noted that digitization brings many benefits, both for users themselves and for companies. It makes life easier for users with the comfort provided by remote control or by its efficiency and cost control among others.

At the same time, it generates new business opportunities, for example, supply companies (water, electricity and gas), improve the monitoring and control capabilities of their systems.

Thethings.io allow to connect all kinds of devices through a wide range of protocols (posar link a la docu on hi ha els protocols) and create custom applications. 

You can connect yourself to your presence sensor, your cooling system or your washing machine and create your own alarms or remote control using thethings.io panel and its tools. If you need help, just contact us! 


UDP with ESP32-S2

In this post we will explain how to connect via UDP to the Thethings.io platform through ESP32-S2. A high-performance IoT module, with which the Chinese giant Espressif will try to reduce the TTM (time to market) of the new IoT products that are yet to come.


Step by Step tutorial

First of all, check that the terminal has Java SE (11 or higher) and Python (3.5 or higher). Otherwise, install the most recent version by clicking on each of the links.

Download the ESP-IDF Tools Installer package that contains the essential tools for programming and debugging the ESP32-S2. To avoid problems, it is recommended that you install in an address that does not contain blank spaces.

Next, install the Eclipse IDE development environment (version 2020-06 CDT). Download the Eclipse Installer program (here) and install the Eclipse IDE for C / C ++ Developers package. Note: do not change the default address to avoid problems.

If you don’t have the Git version manager, install the most recent version by clicking on the link. Once installed, clone the ESP-IDF 4.2 repository where the ESP32-S2 module libraries are located (here).

From the Eclipse IDE program, first install the plugin, and then the tools. Instructions can be found here.


Take the ESP32-S2-Saola-1 kit from Espressif and connect it via USB to the terminal. From here, you can:

  1. Create a project.
  2. Create a project with a template.
  3. Open a project.


CREATE A PROJECT


Projects are easily created by selecting the File> New> Espressif IDF Project tab. Enter the name and click Finish.


CREATE A PROJECT WITH TEMPLATE


Template projects are the best option for both novice users, who want to discover first-hand the potential of the ESP32-S2, as well as experts or professionals, who appreciate having  parts of the code already made to quickly move to the testing phase.


Select the File> New> Espressif IDF Project. Give the project a name and click Next>. Mark the top checkbox and choose one of the many examples available. Note: some only work for ESP32, which is the pre-ESP32-S2 chipset.


OPEN A PROJECT


Thethings.io has created a sample project (ttio_udp_client) to show platform users how to use the ESP32-S2-Saola-1 kit to take temperature samples and upload them to the cloud via UDP protocol. To download it click here https://github.com/theThings/ESP32_UDP. Note: It is important to save the project in the folder configured as a workspace in the Eclipse IDE.


Once downloaded select File> Import…. A new window will appear. Select the option Espressif / Existing IDF Project and click Next>. Indicate the location and click Finish.


Before compiling, the user needs to fill in three code definitions. From the project explorer window (located on the left of the screen) locate and open the main file, main.c. Definitions are at the beginning.


Write the identifier and password of the Wi-Fi from which you want to make the connection and the token number assigned to the thing, which will be responsible for storing the samples received by UDP. Note: if the Wi-Fi does not have a password, leave the space empty (“”).


New users of the Thethings.io platform who need to create an account can do so at https://thethings.io and follow the steps. After registration is complete, create a new IoT product through the Things Manager screen and select JSON as the product type.


Once the main.c file has been modified, click on the hammer icon (above the project explorer) to compile. Verify that the process has finished without errors or warnings.

Next, start recording the kit by clicking on the play icon (located next to the hammer). 

However, to see the values on the web, it is necessary to add the following function by clicking on the ‘Cloud code’ tab and the ‘Add Function’ button.

Once completed, you can see from the Things Details screen how a temperature record has been created, which will be updated every 5 minutes.


Optionally, the application can be tracked via USB by opening the terminal window. Select the Window> Show View> Terminal. A new window will appear with various icons in the upper right. Click the first of all (the one that looks like a screen). A new configuration window will appear. Select the port to which the kit is connected and leave the rest of the default values. Click OK to start communication.


Use thethings.iO, the simplest enterprise IoT platform. If you have any doubts please contact us at hello@thethings.io


Implement Machine Learning for Predictive Maintenance

The benefits of predictive maintenance, such as helping determine the condition of equipment and predicting when maintenance is due, are extremely strategic.

Together with the implementation of solutions based on Machine Learning, you can help even more and generate significant cost savings, greater predictability and greater system availability.

Data is collected over time to monitor equipment health. The goal is to find patterns that can help predict and ultimately prevent failures.

Why use ML in predictive maintenance?

Because ML allows you to:

  • Create predictive models to maximize asset life, operational efficiency, or uptime.
  • Take advantage of past and ongoing data.
  • Optimize periodic maintenance operations.
  • Avoid or minimize downtime. This will help avoid dissatisfied customers, save money, and perhaps save lives.

In industrial AI, the process known as “training” allows ML algorithms to detect anomalies and test correlations while looking for patterns in various data sources. Although regular maintenance is better than failure, we often end up doing maintenance before it is needed. Therefore, it is not an optimal solution from a cost perspective.

Predictive maintenance avoids maximizing the use of your resources and will detect anomalies and failure patterns and give early warnings.


thethings.iO easyGateway

As many of you will know, this year part of 2G networks are being eliminated in different countries despite the moratorium imposed at the time. In this sense, integrators and manufacturers have focused on this fact, advancing to what had to happen one day and left devices ready for this. Manufacturing and designing equivalent devices with NBIoT, Lorawan and even 4G connectivity.

Even so, in many contexts the change from 2G to 3G or 4G had not been made due to the battery consumption that this change implied on the device, which in many cases must be autonomous and without the possibility of being connected to the electrical network to remain on, so that the best alternative to adapt these devices in case of not having good Sigfox or Lorawan coverage is undoubtedly the NBIoT connectivity.

At the level of data volume and directly impacting the cost of connected things, the UDP protocol is undoubtedly the most widely used protocol.

That said, many times we find companies that do not have the capacity or sufficient volume to be able to modify or customize the connection protocol or what is the same, the shape of the plot and the data that is sent. It is for this reason that thethings.iO, advancing the change of all these devices, launches a new service that helps and allows all these companies to be able to integrate their devices seamlessly with the platform: thethings.iO easyGateway.

What is easyGateway?

easyGateway is the new system of thethings.iO to integrate all your NBIoT / UDP devices that come with factory firmware and cannot modify their protocol to connect to thethings.iO with the defined protocol.

How does it work and what is its performance?

Very easy. Your productId will have a dedicated UDP port only for your product, so you will have a highly available communication channel independent of the rest of the devices or server load that allows you to have the data received immediately available on the platform. As you will see later, it is for this reason that the easyGateway service is a service that is billed separately but that is only € 10 / month regardless of the number of devices you connect or have running without associated development costs.

How much does the development of my custom easyGateway cost for my product?

  1. easyGateway is designed for quick and easy startups. No associated development costs that increase the initial cost of implementation and allow our customers to launch MVPs without an initial overhead of preparation expenses. The cost of the service is established to be able to reserve the port and dedicate a single channel for your product without queues with other devices.

Is easyGateway free then?

No. At the development level we want you to start quickly and be able to demonstrate to your clients that your integration and your project are working correctly, so the development is cost 0 and is available in 48h-72h from its activation. Once activated, easyGateway is billed monthly.

The devices with which I use easyGateway, how do I register them?

With easyGateway this process is facilitated in a fully automated way as in the case of Sigfox. Once this feature is activated, any device that you connect configured to the port indicated by the platform will appear automatically in the things manager panel with the name associated with the serial number or identifier sent by the device.

And the data?

Once the frame and the device have been converted in the things manager of thethings.iO, you can decode the received frame as a normal and simple payload in the same way as with connected Sigfox or Lora devices.

How can I learn more?

Soon we will post more information on our developers.thethings.io page so that you can follow the integration tutorial (estimated integration time <10 minutes) and you can find examples on our blog with the steps to follow  for its use.

When will it be available?

The system is now available by sending the frame format to easyGateway@thethings.io . The automated system for generating gateways through the panel will be available in early 2021 so the activation will be completely instantaneous and automated.

What does thethings.iO easyGateway mean?

A before and after in the integration of NBIoT systems since with absolutely no development on the device, with zero cost of firmware or hardware customization and with the simple configuration of the assigned port ( the same of the productId ) and the server easyGateway.thethings.iO you already have your IoT system started in less than 24 hours. All this without touching or paying a single development line on the device. You buy your devices from your NBIoT device provider, configure the connection and you’re done. Your data and your NBIoT devices with your own IoT platform in a matter of hours!


The Benefits of IoT in the Cold Chain

The cold chain is a supply chain in which the temperature of the products must be controlled. Cold chains are commonly associated with the pharmaceutical and food industries. Food losses are astronomical, largely due to cold chain problems.

The cold chain is big business and the stakes are high. The implications of a poorly maintained and supervised cold chain go far beyond monetary losses. Foods or medications that are unknowingly outside temperature tolerances can pose a hidden risk. They can become contaminated with bacteria even if they are not visibly spoiled. After reaching the hands of a consumer or patient, these contaminated products can cause serious illness or even death.

For this reason, pharmaceutical and food companies do their best to establish cold chains that are rigorously managed and traced.

So what role does IoT play in improving cold chain safety and efficiency? An obvious contribution lies in the temperature control sensors. These relatively small GPS / GSM enabled sensors can be placed on a pallet or box. They provide live temperature readings throughout the journey from one end to the other.

At the very least, real-time temperature tracking of products enables cold chain managers to identify shipments that have fallen outside of temperature tolerances for a period long enough to be considered spoiled. Those goods can be withdrawn from the supply chain once they reach an intermediate point or final destination and destroyed before causing harm to a consumer.

Better yet, by receiving timely alerts about out-of-tolerance temperatures, a cold chain manager can quickly initiate corrective actions that prevent spoilage entirely.

A digital supply chain solution, which uses predictive analytics, can anticipate a shipment’s scheduled route to identify problems before they occur. By plotting the predicted temperature along the predicted location of a transportation mode over time, a digital supply chain solution can highlight shipments at risk even before they leave.

A digital supply chain solution could also suggest a change to a route, where the expected temperatures are more favorable than the original route.

With thehtings.io you can collect the data from your sensors (we are agnostic to HW) and customize the application to monitor your KPIs  and add the BI needed to take the right actions and decisions for your business.  


Connecting ESP32 to thethings.iO using CoAP

In this post we will explain how to connect via CoAP to the Thethings.io platform through ESP32-S2. A high-performance IoT module, with which the Chinese giant Espressif will try to reduce the TTM (time to market) of the new IoT products that are yet to come.


Step by Step tutorial

First of all, check that the terminal has Java SE (11 or higher) and Python (3.5 or higher). Otherwise, install the most recent version by clicking on each of the links.

Download the ESP-IDF Tools Installer package that contains the essential tools for programming and debugging the ESP32-S2. To avoid problems, it is recommended that you install in an address that does not contain blank spaces.

Next, install the Eclipse IDE development environment (version 2020-06 CDT). Download the Eclipse Installer program (here) and install the Eclipse IDE for C / C ++ Developers package. Note: do not change the default address to avoid problems.

If you don’t have the Git version manager, install the most recent version by clicking on the link. Once installed, clone the ESP-IDF 4.2 repository where the ESP32-S2 module libraries are located (here).

From the Eclipse IDE program, first install the plugin, and then the tools. Instructions can be found here.

Take the ESP32-S2-Saola-1 kit from Espressif and connect it via USB to the terminal. From here, you can:

  1. Create a project.
  2. Create a project with a template.
  3. Open a project.


CREATE A PROJECT

Projects are easily created by selecting the File> New> Espressif IDF Project tab. Enter the name and click Finish.


CREATE A PROJECT WITH TEMPLATE

Template projects are the best option for both novice users, who want to discover first-hand the potential of the ESP32-S2, as well as experts or professionals, who appreciate having  parts of the code already made to quickly move to the testing phase.


Select the File> New> Espressif IDF Project. Give the project a name and click Next>. Mark the top checkbox and choose one of the many examples available. Note: some only work for ESP32, which is the pre-ESP32-S2 chipset.


OPEN A PROJECT

Thethings.io has created a sample project (ttio_coap_client) to show platform users how to use the ESP32-S2-Saola-1 kit to take temperature samples and upload them to the cloud via CoAP protocol. To download it click here https://github.com/theThings/ESP32_COAP

Note: It is important to save the project in the folder configured as a workspace in the Eclipse IDE.

Once downloaded select File> Import…. A new window will appear. Select the option Espressif / Existing IDF Project and click Next>. Indicate the location and click Finish.

Before compiling, the user needs to fill in three code definitions. From the project explorer window (located on the left of the screen) locate and open the main file, main.c. Definitions are at the beginning.

Write the identifier and password of the Wi-Fi from which you want to make the connection and the token number assigned to the thing, which will be responsible for storing the samples received by CoAP. Note: if the Wi-Fi does not have a password, leave the space empty (“”).

New users of the Thethings.io platform who need to create an account can do so at https://thethings.io and follow the steps. After registration is complete, create a new IoT product through the Things Manager screen and select JSON as the product type.


Once the main.c file has been modified, click on the hammer icon (above the project explorer) to compile. Verify that the process has finished without errors or warnings.

Next, start recording the kit by clicking on the play icon (located next to the hammer). Once completed, you can see from the Things Details screen how a temperature record has been created, which will be updated every 5 minutes.

Optionally, the application can be tracked via USB by opening the terminal window. Select the Window> Show View> Terminal. A new window will appear with various icons in the upper right. Click the first of all (the one that looks like a screen). A new configuration window will appear. Select the port to which the kit is connected and leave the rest of the default values. Click OK to start communication.

Use thethings.iO, the simplest enterprise IoT platform. If you have any doubts please contact us at hello@thethings.io