Uplink and downlink Sigfox communication with thethings.iO

Bidirectional communication sometimes it’s relevant on the Internet of Things field. In some LPWAN protocols it’s complex to have bidirectional communication. With Sigfox and thethings.iO it’s really easy to set up bidirectional communication, that is called downlink.

Sigfox downlink with thethings.iO

Sigfox downlink with thethings.iO

On today’s post, we are going to connect a Sigfox device with the Sigfox backend in order to maintain a bidirectional communication with thethings.iO.

What is Sigfox uplink and downlink?

The uplink process is the usual way of data coming from the devices to the Sigfox backend, that can be redirected to thethings.iO with a callback. Find here how to connect Sigfox with thethings.iO.

The downlink process is the process that enables a device to get data coming from a cloud, a mobile application or another device.

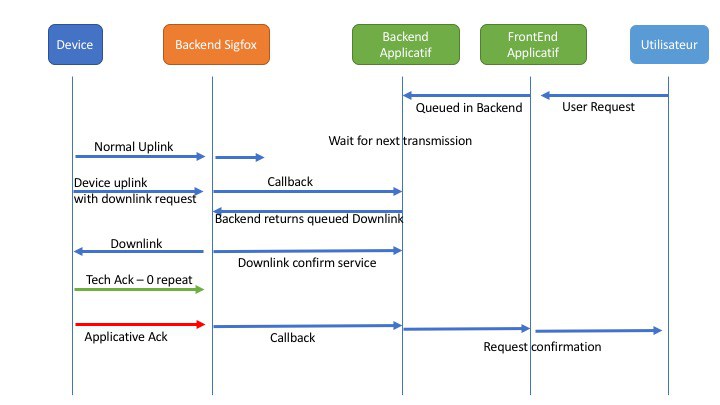
This downlink process is only available when the uplink process includes an ACK flag corresponding to a downlink request. At that point thethings.iO will be available to transfer the downlink message to the device through the Sigfox backend.

Find here a diagram by disk91 where you can understand better the downlink workflow interaction.
Have in mind that most of these devices are low power devices or they are running with batteries, that means that they are not able to receive data anytime.

Let’s build the downlink

Make sure you already have:

Let’s start!

thethings.iO IoT Platform

Once you have an account, if you don’t have a Sigfox product to use, follow this steps:

  1. Enter to your account and click on Things.
  2. Press on Create new IoT product.
  3. Select Sigfox as Serialisation format.
  4. Give a name and choose Akeru/Smart Everything for the board.
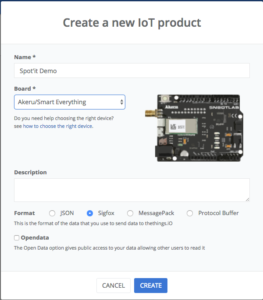
  5. Click on the previously created product and copy the subscription URL.

Registering the Callback at the Sigfox backend

Once you have copied the previous url, navigate to the Sigfox backend.

  1. Click on your device.
  2. Navigate to callbacks.
  3. Create a new Callback: Make sure you select DATA and BIDIR as the type and POST as the HTTP Method.
  4. Given the previous url, add /downlink at the end of the url. The url should look similar to: https://subscription.thethings.io/sgfx/1234/abcdefghijklmn/downlink?id={device}&data={data}Also, if you want any other Sigfox variables, feel free to add: &radius={radius}&seqNumber={seqNumber}&snr={snr}&time={time}&station={station}&rssi={rssi}&ack={ack}

The Sigfox downlink parser at thethings.iO

Following the registration of the callback at the sigfox backend, we should proceed to create and fill the sigfox_downlink_parser associated to your product:

  1. Navigate to Cloud Code
  2. Move to Functions and create a new function called sigfox_downlink_parser. Make sure to introduce the previous name correctly.
  3. Fill the sigfox_downlink_parser:
    • In order to prepare the data to be returned to the device, follow the next structure:
      • The result variable should be an object: With the device id as the key and with a new variable (limit size of 8 bytes) as the value:
        var result = {“sigfoxDeviceId”: { “downlinkData”: “variable or message to send”}}
  4. Following the previous requirement, a simple parser should look like this:
    function main(params, callback) {
    var result = {};

var variable = "sigfoxDw";
result[params.deviceId] = { downlinkData: variable };
callback(null, result);
}

Device downlink management

Each sigfox device library should provide the necessary function in order to extract the acknowledged data from thethings.iO.

Focusing on the Smart Everything, there’s an example on github showing the handling of the downlink data.

Feel free to create an account at thethings.iO and start connecting things to the Internet with the most simple enterprise IoT platform.

Looking for partners for the best IoT platform

At thethings.iO we are growing worldwide, from New Zealand to Canada, passing through Argentina or Ireland, companies need to connect things all around the world. This is the reason why we are looking for businesses, integrators and consultancies to refer, resell, and implement thethings.iO as an IoT software solution locally.

thethings.iO partners

thethings.iO partners

Currently, thethings.iO partners are businesses or individual professionals who frequently use our product to deliver an end-to-end IoT solution to their customers. We call them integrators: consultancy firms, engineering teams or development shops working for companies who need to connect their assets.

Using thethings.iO as an IoT platform lets integrators cut costs while delivering a top-nocht Internet of Things solution to their customers. Easy prototyping, fast demos, simple scalability and uncomplicated implementation helps them save time and money.

And becoming our partner makes it even better. Partner integrators have premium discounts on thethings.iO public pricing, receive marketing and development support and get high priority at our helpdesk. Partners also get prior access to new product features and have a private development sandbox, among other exclusive features.

Interested in becoming a partner? Are you an integrator who need the best IoT platform in the market? Speak with one of our Partner Managers today and start making actionable insights with the IoT and Big data.

Using Sigfox Spot’it with thethings.iO to geolocate your Sigfox things

Geolocate a device is very powerful in some use cases. Understand where is an asset, my car or my dog is priceless in specific moments where there is money or life in risk. All of this depends on having GPS availability on the hardware, usually a GPS chip introduced on the shield with an antenna. With the GPRS and 3G, etc the antenna’s triangulation enabled IoT devices (and mobile handsets) to become geolocalized with some errors but without GPS chip. Now Sigfox is releasing a similar feature, Sigfox antennas triangulation enable geolocation with no GPS chip, that makes your hardware cheaper than expected.

Today we are going to connect a Sigfox device with the Spot’it service. Spot’it is the newest location manager of Sigfox. Now with thethings.iO and Sigfox Spot’it you can track all your Sigfox devices in a very simple way. thethings.iO is the most simple Sigfox IoT platform.

Make sure you already have:

Let’s start!

thethings.iO IoT Platform

Once you have an account, if you don’t have a Sigfox product to use, follow this steps:

  1. Enter to your account and click on Things.
  2. Press on Create new IoT product.
  3. Select Sigfox as Serialisation format.
  4. Give a name and choose Akeru for the board.
  5. Click on the previously created product and copy the subscription URL.

Registering the Callback at the Sigfox backend

Once you have copied the previous url, navigate to the Sigfox backend.

  1. Click on your device.
  2. Navigate to callbacks.
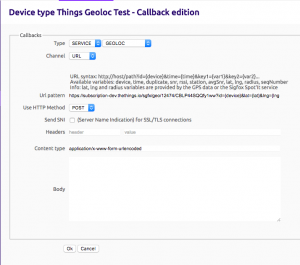
  3. Create a new callback. Make sure you choose Service as the type of callback and GEOLOC as the type of service.
  4. Beginning with the previous URL, make sure to erase the data={data} and include lat and lng to the previous url.

The url should look like this: https://subscription.thethings.io/sgfx/geo/1234/abcdefghijklmn?id={device}&lat={lat}&lng={lng}

Also, if you want any other Sigfox variables, feel free to add: &radius={radius}&seqNumber={seqNumber}&snr={snr}&time={time}&station={station}&rssi={rssi}

All the Sigfox variables that you specify will be automatically parsed into resources in your thethings.iO thing.

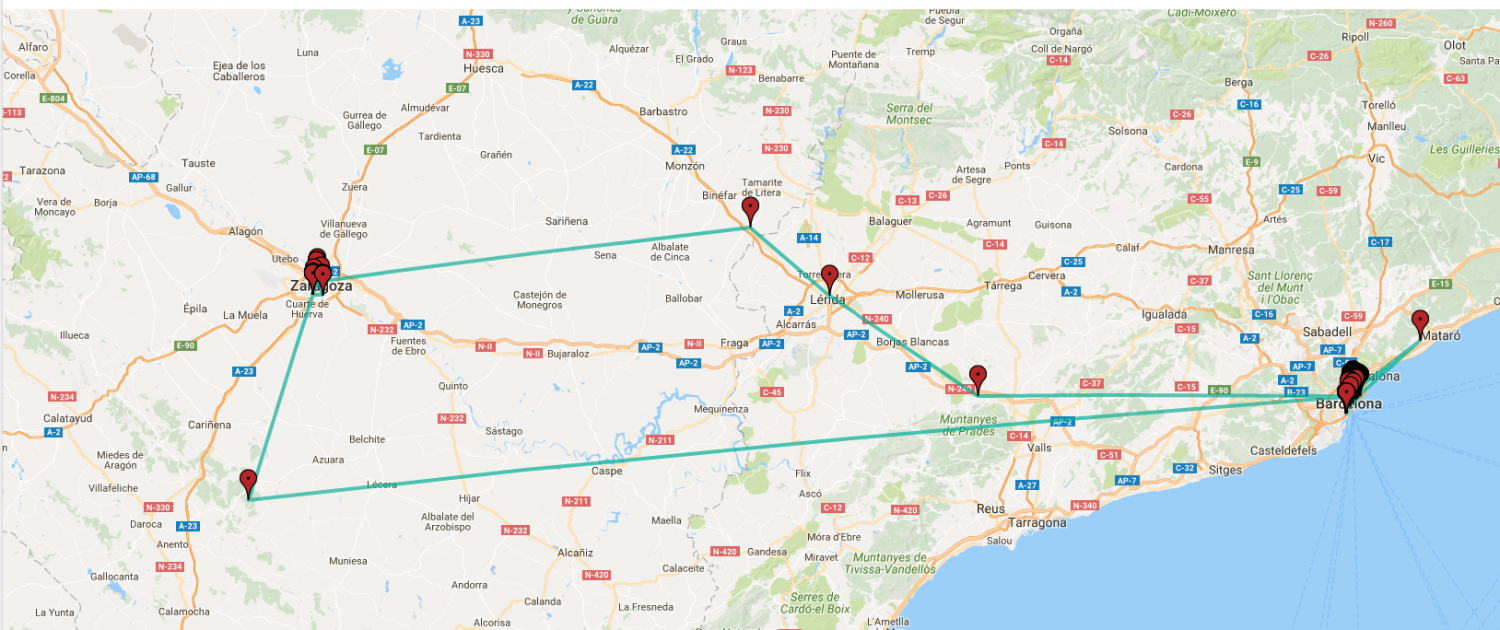
Showing device location as a path at thethings.iO is simple

First of all go to create a thethings.iO dashboard.

To create a dashboard in your thethings.iO account to show the device location in a map. The location should be presented as a path of different points in a map.

  1. Click on the Add Widget blue button.
  2. Give a name to the Widget.
  3. Select Thing Resource inside Data Source.
  4. Select thing you just created before.
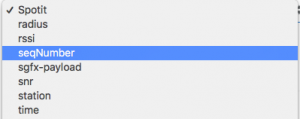
  5. Select ‘Spotit’ as the name of the resource that contains the location.
  6. Check Historical and press the Routes box.
  7. Click on Costumize it and select the number values you want to show. Also select “Activate markers to show each point and Activate path”.
  8. Accept and Save!

Easy right? Now you can geolocate any Sigfox device and see the routes and more information at thethings.iO in just 5 minutes. Try it yourself!

Connect mcThings with thethings.iO IoT platform

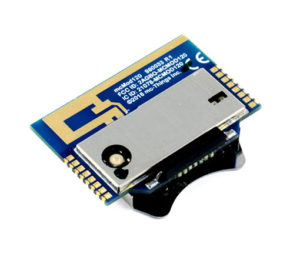
Hardware is one of the most important part of the connected products actually. During the prototyping phase it’s important to have great hardware running your use case. We found that mcthings it’s a great hardware platform to build prototypes and real hardware on the top. If you are developing a project in United States, Latam or Oceania using Sigfox, you cannot miss mcThings hardware platform. Of course you also can use this hardware for WiFi and other protocols as we are going to show today with thethings.iO IoT platform.

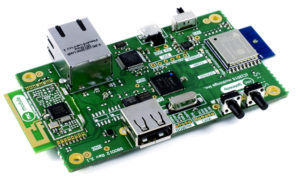
On todays post we’re going to connect the mcModule 120 with the MQTT protocol and the mcGateway (from mcThings) to thethings.iO.


Before following some steps, please make sure:

  • You have downloaded and installed mcStudio.
  • A micro usb cable to connect the mcGateway or the mcDongle (to OTA update the devices).
  • A mcGateway, a mcDongle and a mcModule.


Lets start! Connecting the mcGateway to the Wi-Fi / Ethernet If you want to connect the mcGateway to the internet using Wi-Fi, as the Quick start guide specifies:

  1. Ensure the Network Mode toggle switch is in the Wi-Fi position. This is indicated by “WIFI” on the underside of your mc-Gateway.
  2. You can connect the gateway via WPS or directly to your WIFI network using the gateway config. For this project, we connect the gateway using WPS.
  3. Start the WPS mode on your Wi-Fi router.
  4. Hold down the push button labeled USER SW for 1 second and release to start the WPS process.
  5. The amber LED labelled CONN will flash while attempting to connect to Wi-Fi
  6. When a network connection is established, the amber LED labeled CONN will turn on.

Otherwise connect the Ethernet cable to the mcGateway.

thethings.iO IoT platform


Create a thethings.iO account:

If you still don’t have an account, please register at thethings.iO IoT platform. In order to create a new thing:

  1. Enter to your account and click on Things.
  2. Press on Create new IoT product.
  3. Give a name and choose Other for the board.
  4. Finish the steps and remember the thing Token.

Programming the mcThings mcModules


    1. Download or clone thethings.iO mcthings repository. Place the contents in your mcthings project and libraries (by default in “My Documents”).
    2. Open the mcStudio application. Change the thing token with an actual token provided to you in the previous step.


    1. Connect to the gateway and to the module. Navigate to “Tools” and click on “Devices”. Select the connected mcGateway.


    1. Configure the mcGateway with the correct thethings.iO MQTT broker:


  1. Build and deploy the code to the modules.

Create a dashboard with thethings.iO IoT platform


  1. Create a thethings.iO dashboard: Now it’s time to create a dashboard in your thethings.iO account to show all the values sent by the mcModules. Lets create some charts:
    1. Click on the Add Widget blue button.
    2. Give a name to the Widget.
    3. Select Thing Resource inside Data Source.
    4. Select thing you just created before.
    5. Select the name of the resource you want to display and the format (pie, chart, graph…).
    6. Click on Customize it and select the number values you want to show.
    7. Accept and Save!

Repeat this last step to build awesome dashboards with thethings.iO!

Upgrading Apache Cassandra Cluster

At thethings.io we use Cassandra as our master time series database. Some weeks ago we needed to upgrade our Cassandra version to a major release version in order to improve the QoS of our architecture.

Cassandra with thethings.iO

This post aims to group all steps that we use for upgrade our Cassandra cluster to a newer version. There are a lot of documentation and sometimes it is a little bit annoying to look at different pages. In case that you use Cassandra for Internet of Things (or any other use case) we hope that this post will be useful.

This section describes how to upgrade Apache Cassandra with zero downtime if your cluster has a replication factor of at least 3.

Note:

  • Be careful when you run these steps on production environments.
  • For command simplicity I don’t include the user and password. Ex: nodetool drain -u username -pw password

Prerequisites

  • Make sure you have an up-to-date daily backup. We use nodetool snapshot tool for that but there are other options as well like OpsCenter.
  • Familiarize yourself with the changes and features in this new release.
  • Remove all dead nodes.
  • Do not run nodetool repair or other tasks.

Please check this link for more information.

Steps for upgrade cassandra version

1. Run nodetool drain before shutting down the existing Cassandra service. This flushes all memtables from the node to SSTables on disk. Cassandra stops listening for connections from the client and other nodes. Also prevents overcounts of counter data, and speeds up restart post-upgrade.

nodetool drain -h hostname

2. Stop cassandra services.

service cassandra stop
service datastax-agent stop

3. Back up your cassandra configuration files from the old installation to safe place.

4. Update java version.

apt-get update
apt-get install oracle-java8-set-default
java -version

5. Install the new version of Apache Cassandra.

apt-get update
apt-get install cassandra=3.0.9

If you are running Cassandra from a source you should download the latest tar.gz instead of using the package manager.

6. Configure the new product. Review, compare, merge and/or update any modifications you have previously made into the new configuration files for the new version (cassandra.yml, cassandra-env.sh, etc.). Take care with the configuration options and check version restrictions.

7. Start the cassandra services.

service cassandra start
service datastax-agent start

Check the logs for warnings, errors, and exceptions.

tail -f /ttio/var/logs/cassandra/system.log # or path where you set your logs.

8. Run nodetool upgradesstables

nodetool upgradesstables

9. Check the logs for warnings, errors, and exceptions.

tail -f /ttio/var/logs/cassandra/system.log # or path where you set your logs.

10. Check the status of the cluster

nodetool -h hostname status

11. Repeat theses upgrade steps on each node in the cluster.

References


[Note: this article was first published on Adria Galin’s blog]

The most simple enterprise IoT platform

A year ago, I wrote Keep IoT simple, stupid where I was trying to explain that with thethings.iO we are trying to bring simplicity into the complex ecosystem of the Internet of Things. Store, analyze and visualize data should not be hard or need any specific team with knowledge on scaling machines, among others. This is the reason why one year ago, at thethings.iO we wanted to become the most simple enterprise IoT platform. And here we are!

The most simple enterprise IoT platform

The most simple enterprise IoT platform

During this year we have participated in several events, research documents and interviews and it’s great to see that we are working towards the right direction, to make thethings.iO becoming the most simple enterprise IoT platform instead of a complex mix of several features. Let me give you few examples.

IoT platform Scorecard made by Machnation

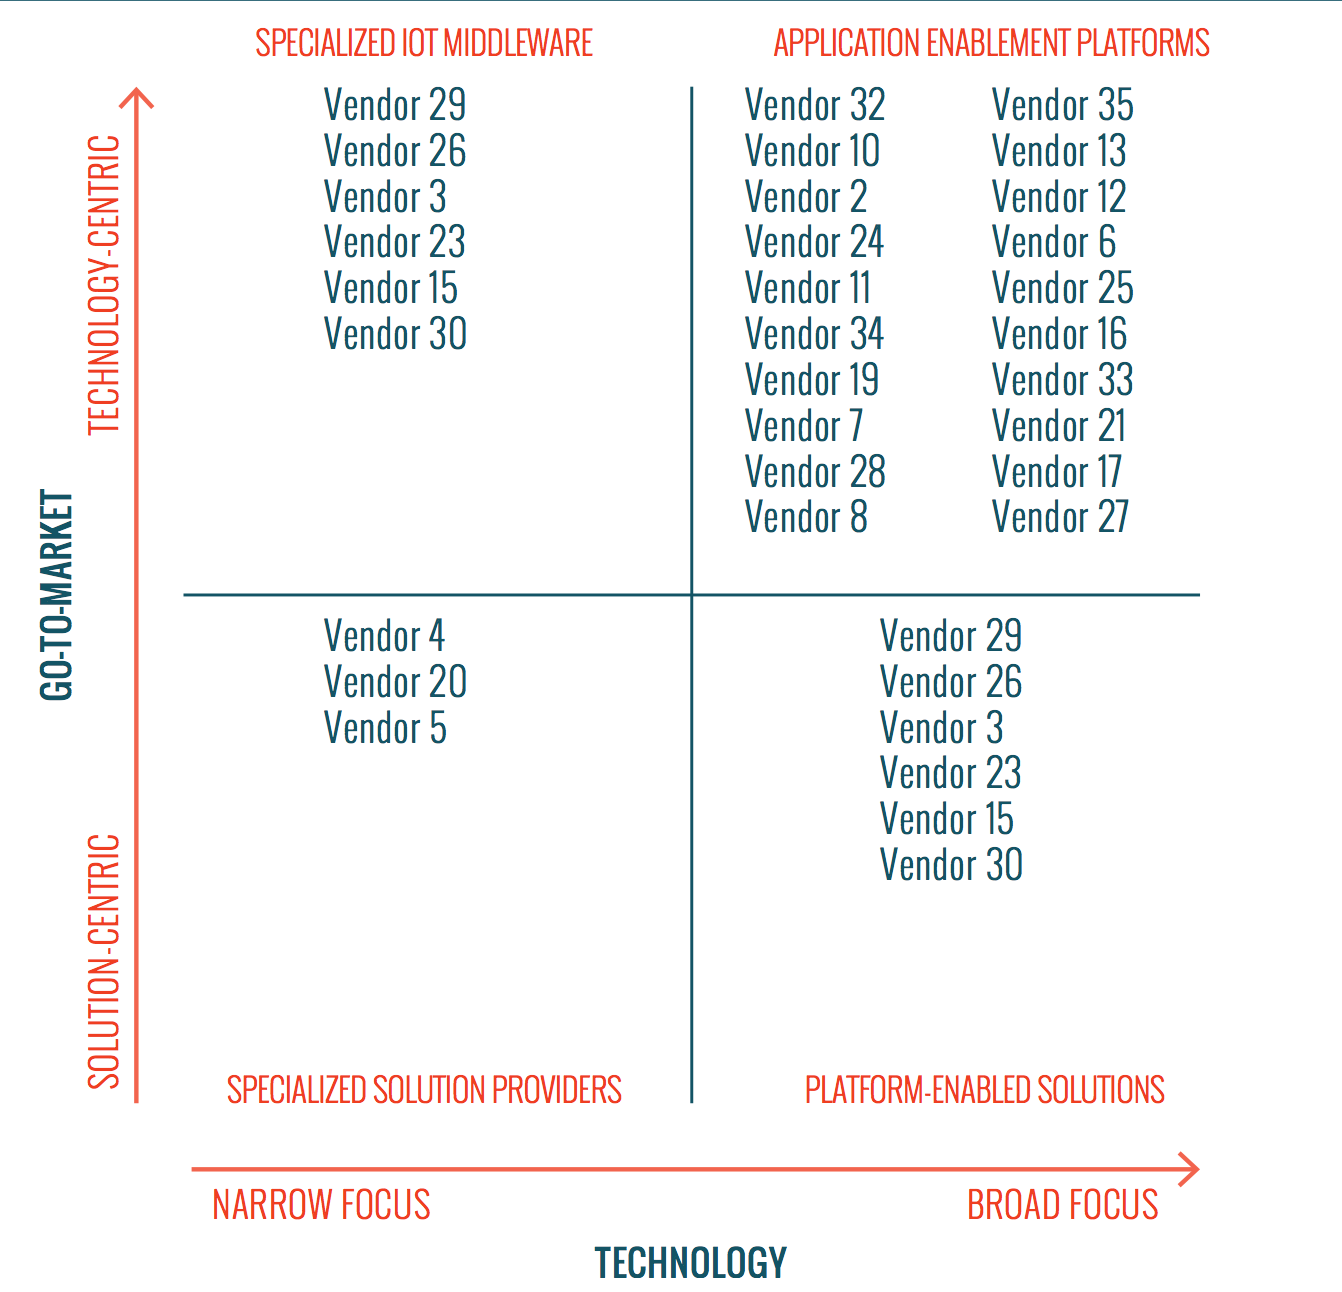
One of the most interesting IoT platform reports, mentioned us as one of the best AEP IoT platform. AEP IoT platform means Application Enablement Platforms that bring a collection of services and features to the hardware and IoT devices. We recently received the results from this research made by Machnation. It’s a really interesting document with a scorecard comparing thethings.iO with other 34 IoT platforms in the market (feel free to purchase it and share it).

IoT platform Scorecard 2016 by Machnation

IoT platform Scorecard 2016 by Machnation

Here some of the comments regarding with thethings.iO:

thethings.iO is positioned in the upper right-hand quadrant of the IoT AEP ScoreCard 2×2 matrix.

thethings.iO is ranked higher than established platforms like PTC ThingWorx in the report. And thethings.iO is towards the top of the ranks compared to the other 34 vendors evaluated.

That’s great that someone who is independent says nice things about thethings.iO.

And more

On the other hand we got insightful feedback from customers, friends, competitors and others letting us learn about what are the most interesting next steps. Few days ago, I read one of these lists that appear by the end of the year. In this case it was a list of the best 20 IoT startups in UK (or more potential or something like that I don’t remember now), and it was great to see one of our customers mentioned there. It makes us proud to see that our customers rock and they rock because we do.

thethings.iO the most simple enterprise IoT platform

We are building the most simple enterprise IoT platform in the market. Call it the most simple Sigfox IoT platform, the most simple industrial IoT platform or change *enterprise* by whatever you think it makes sense.

During 2017 you are going to see more and more features that go towards that direction. Feel free to let us know your feelings and feedback and let’s stay connected during 2017.

Connect KEPServerEx to an IoT platform

Industry is getting into the Internet of Things, some call it Industry 4.0 some other use other names. The hard thing of the industry is that sometimes the companies still use old protocols, legacy machines and systems. The protocol OPC UA (Unified Architecture) is one of the most extended IoT industrial standard for automation. At thethings.iO we want to lead industrial companies to get into the Internet of Things (IoT) and Industry 4.0. This is the reason why we are enabling our industrial customers with IoT gateways and compatibility with existing industrial products such as KEPServerEX, to seamlessly stream real-time industrial data to thethings.iO and apply all the operational tools and Big Data with cloud code and build dashboards and apps for final customers, among other features.

kepserverex and thethingsiO IoT platform
Today we will show you how to connect KEPServerEx to thethings.iO with MQTT. KEPServerEX is an OPC server and connectivity platform for industrial automation. As you will see, it is very fast and easy to forward data from your industry to IoT platform of thethings.iO ! So let’s get started!

Step 1: Install KEPServerEX

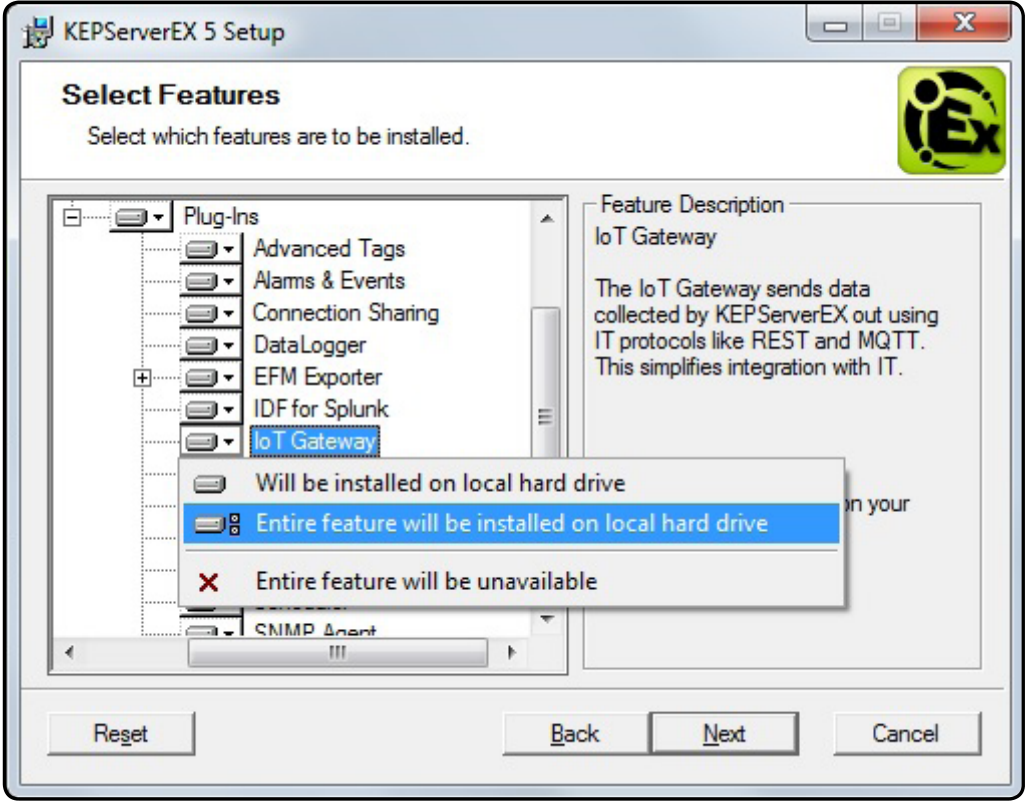
First, during the installation of KEPServerEx, we choose the IoT Gateway under Plug-Ins to be installed as well. We select ‘Entire feature will be installed on local hard drive’.

kepserverex-thethingsio-iot-platform-step-01

Step 2: Add an agent with REST client

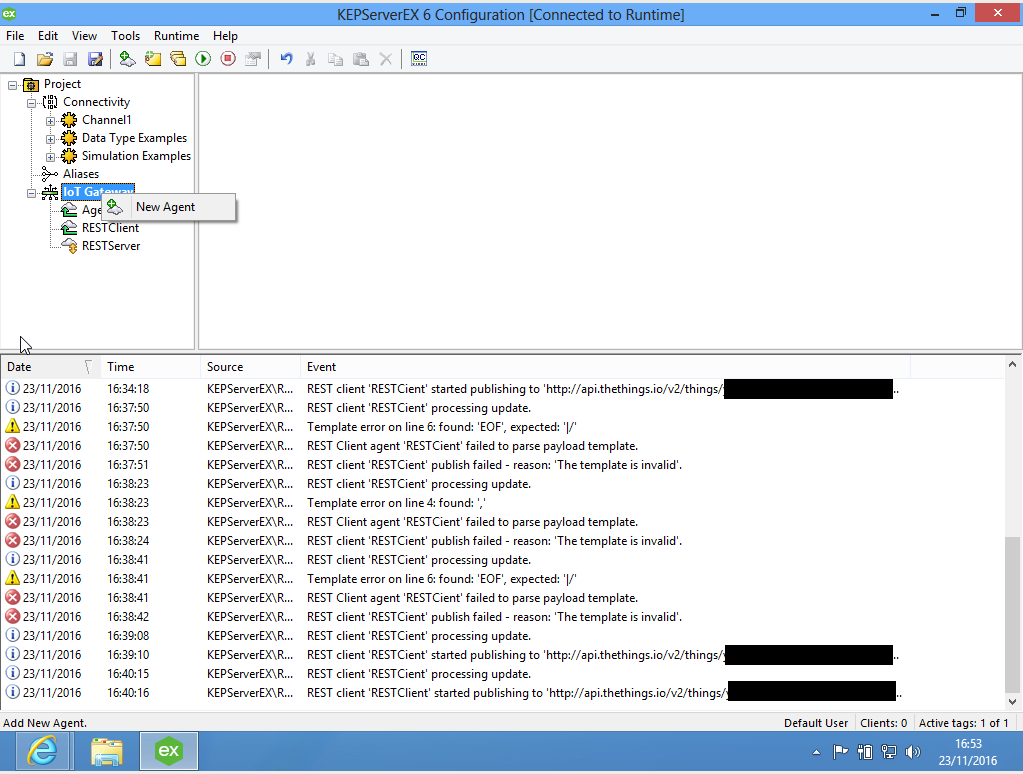
After the installation is finished, we open KEPServerEX and then right-click on ‘IoT Gateway’ and select ‘New Agent’.

kepserverex-thethingsio-iot-platform-step-02

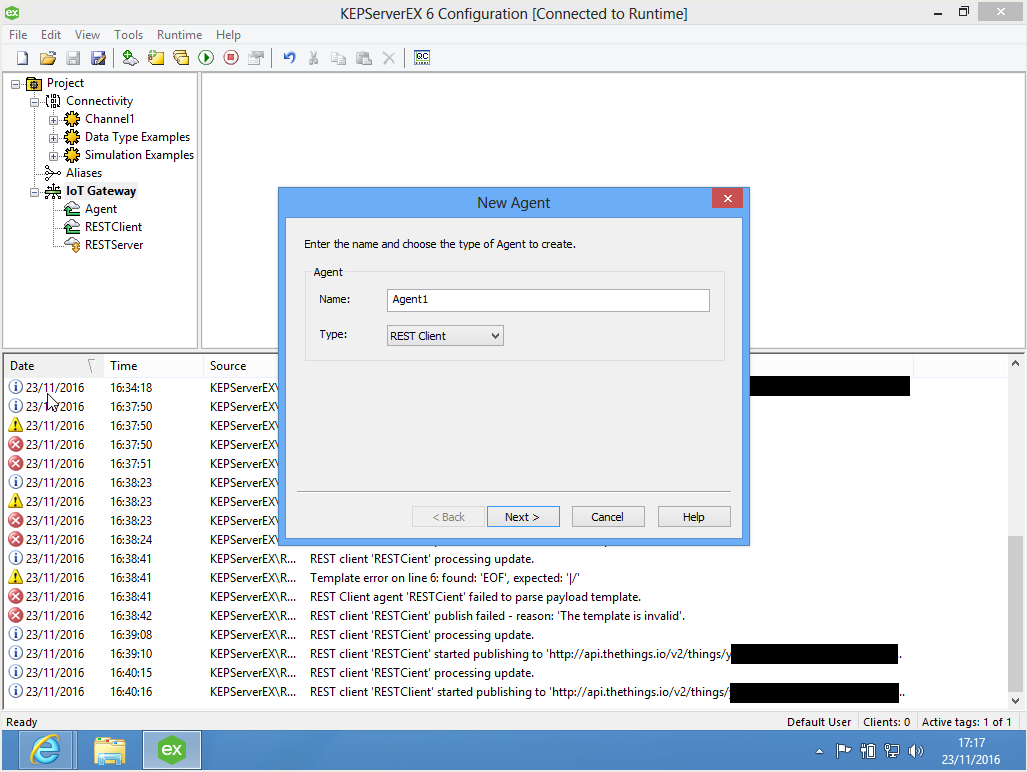
Then we choose a name for your agent and as type “REST Client”. Click ‘Next’.

kepserverex-thethingsio-iot-platform-step-03

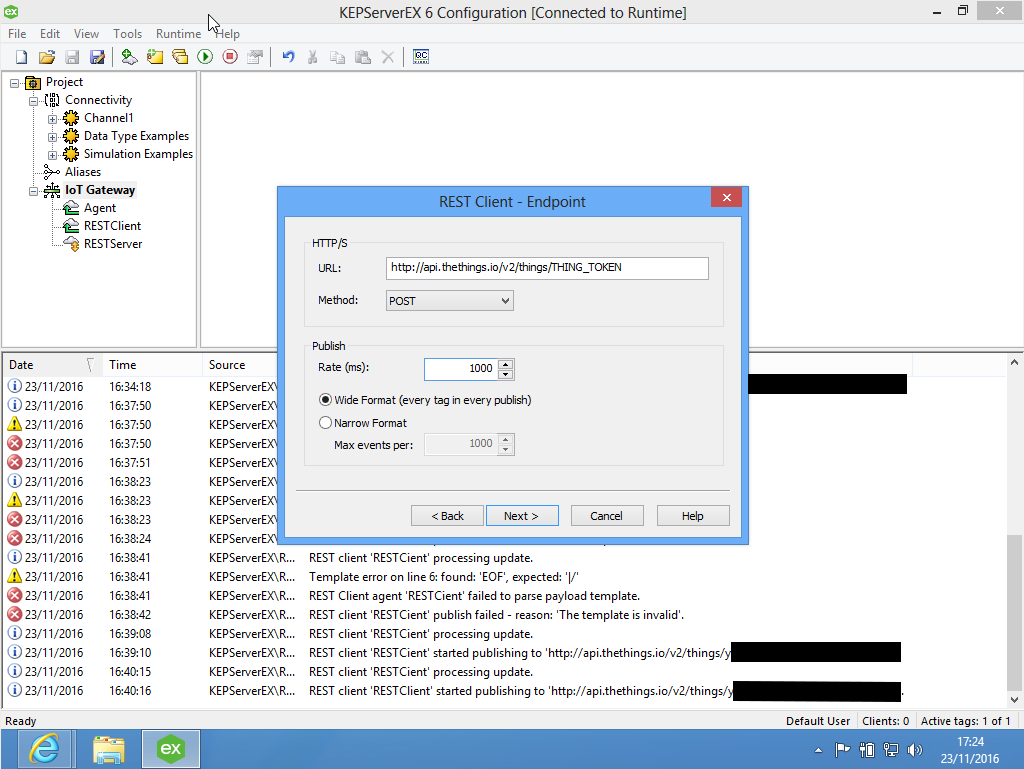
Now, at the endpoint configuration, at the URL field we insert http://api.devices.thethings.io/v2/things/THING_TOKEN where THING_TOKEN is the token of the thing you want to send the data to. As method, we choose POST, put the publish rate to 1000 and select ‘Wide Format’.

kepserverex-thethingsio-iot-platform-step-04

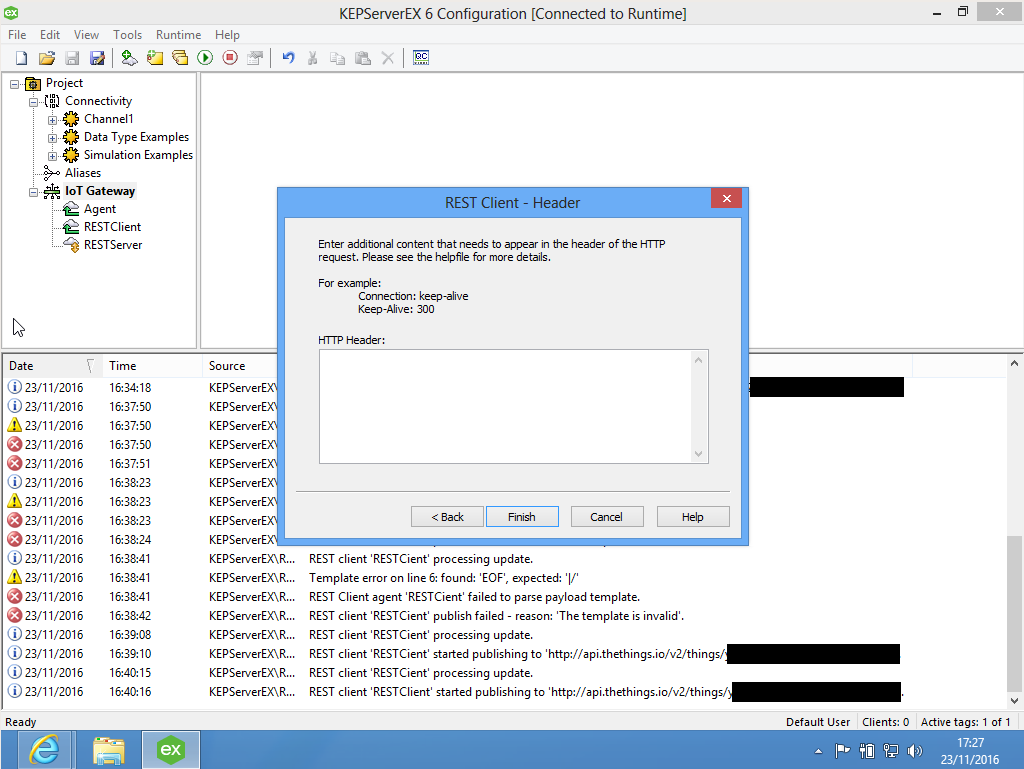
After that, we  leave the header configuration empty and click ‘Finish’.

kepserverex-thethingsio-iot-platform-step-05

Step 3: Add IoT Items

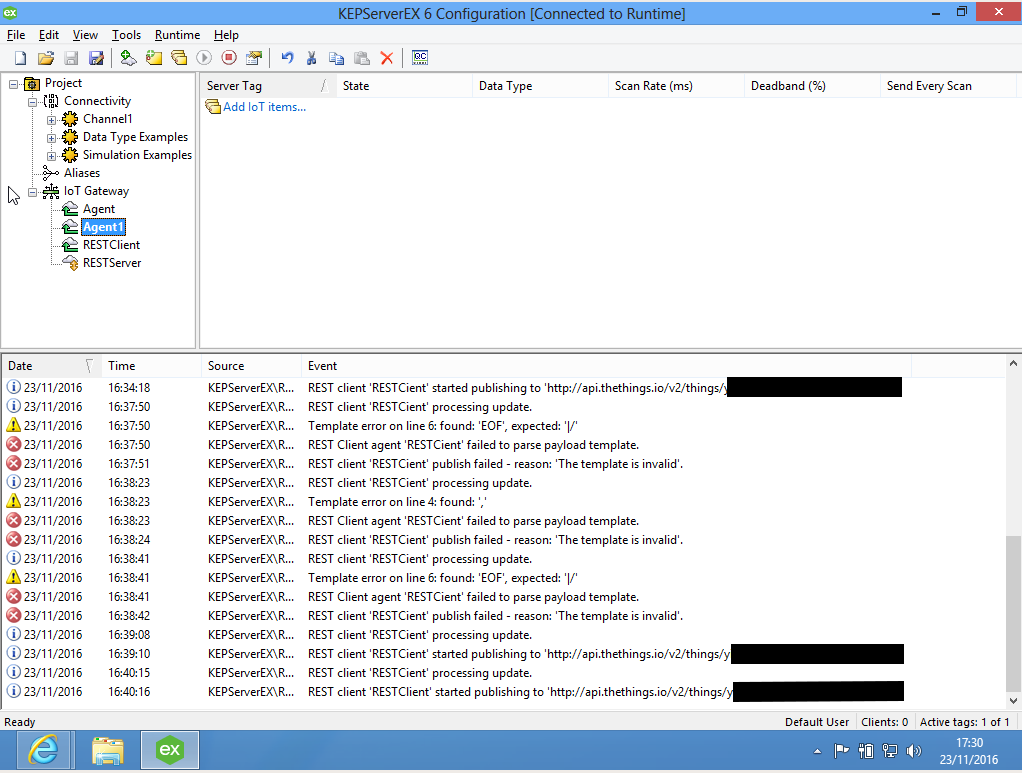
The next step is to add an IoT Item to send data from. In order to do that, we click on our freshly created Agent and then on ‘Add IoT items…’.

kepserverex-thethingsio-iot-platform-step-06

For this tutorial we will use a simulator which generates random numbers and send them to thethings.iO

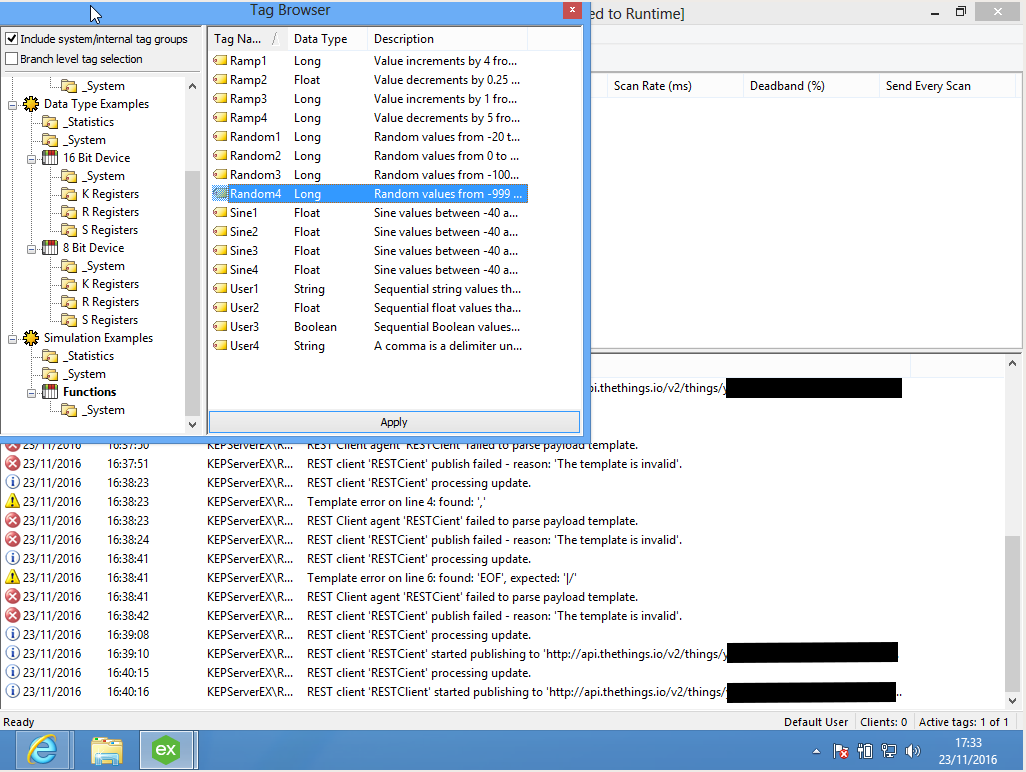
In the Tag Browser, we click on Simulation Examples, then on ‘Functions’ and choose Random4. Then we click ‘Apply’.

kepserverex-thethingsio-iot-platform-step-07

At the window for the item configuration that opens next, in the publish field we select ‘Every Scan’, leave everything else as it is and click ’OK’.

kepserverex-thethingsio-iot-platform-step-08

Step 4: Configure the agent

The last step is to do some final configuration on the agent we created before. For that, we right click on the agent  and choose ‘Properties’.

kepserverex-thethingsio-iot-platform-step-09

Then, in the body tab, we choose ‘Advanced Template’ and put the following:

{
    “values”:[
    |#each VALUES|
        {“key”: “test”, “value”: “|VALUE|”}#unless @last|,|/unless|
    |/each|
    ]
}

kepserverex-thethingsio-iot-platform-step-10

After that,  we click on ‘OK’. If everything went well you will see the following message:

kepserverex-thethingsio-iot-platform-step-11

We can now go to our panel at thethings.iO and see how the random numbers are arriving!

kepserverex-thethingsio-iot-platform-step-12

thethings.iO is the most simple enterprise IoT platform. Do not hesitate to sign up and test it with your KEPServerEX with OPC UA. We are the IoT platform that you are looking for.

Particle Photon with thethings.iO IoT platform

At thethings.iO we love to play with hardware and today we are going to show you how to program and send data with a Particle Photon board to thethings.iO. For this, we are going to use the Particle Buid system as the IDE because it’s more integrated on the Particle system.

Particle loves thethings.iO IoT platform
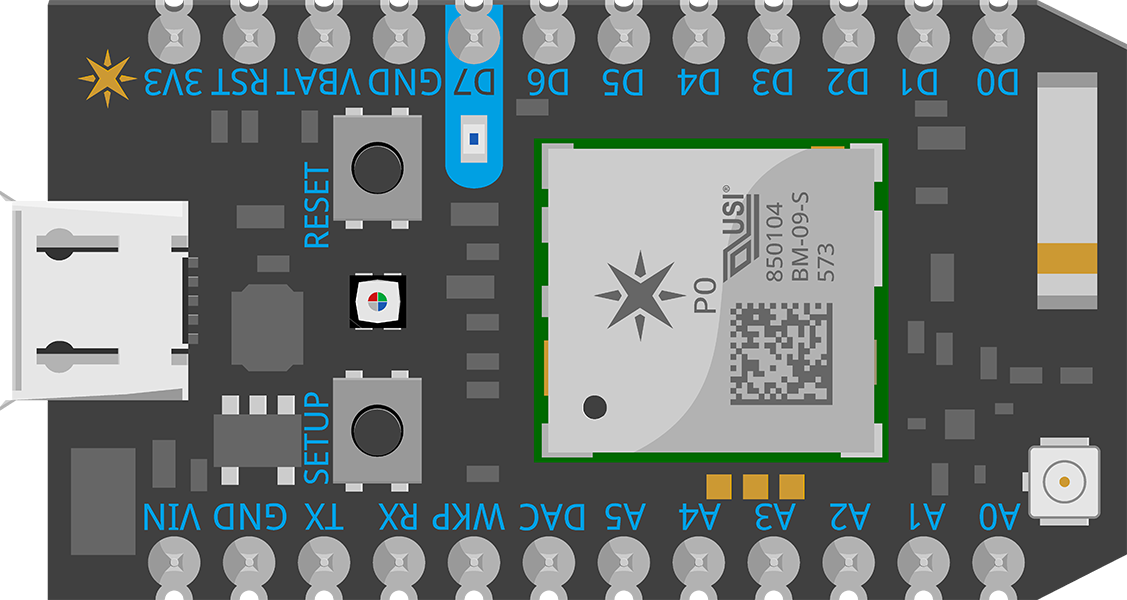
The Particle Photon is a development kit made with a micro-controller ARM Cortex M3. It brings Digital I/O and Analog input and output, SPI, I2C, CAN, PWM among other.

Particle Photon

Particle Photon

Let’s start showing you how to connect the Particle Photon which is a WiFi board with thethings.iO IoT platform in order to have a Photon on steroids thanks to thethings.iO features.

If you already have an account and your device is already claimed, please jump to step 3.

    1. Claim your photon: Install particle-cli and type “particle setup” from a terminal console. This command will guide through account creation and device claiming (make sure you connect your device via usb first).
    2. Create a thethings.iO account: If you still don’t have an account, please register at thethings.iO IoT platform. In order to create a new thing:
      1. Enter to your account and click on Things.
      2. Press on Create new IoT product.
      3. Give a name and choose Other for the board.
      4. Finish the steps and remember the thing Token.
Particle IDE

Particle IDE

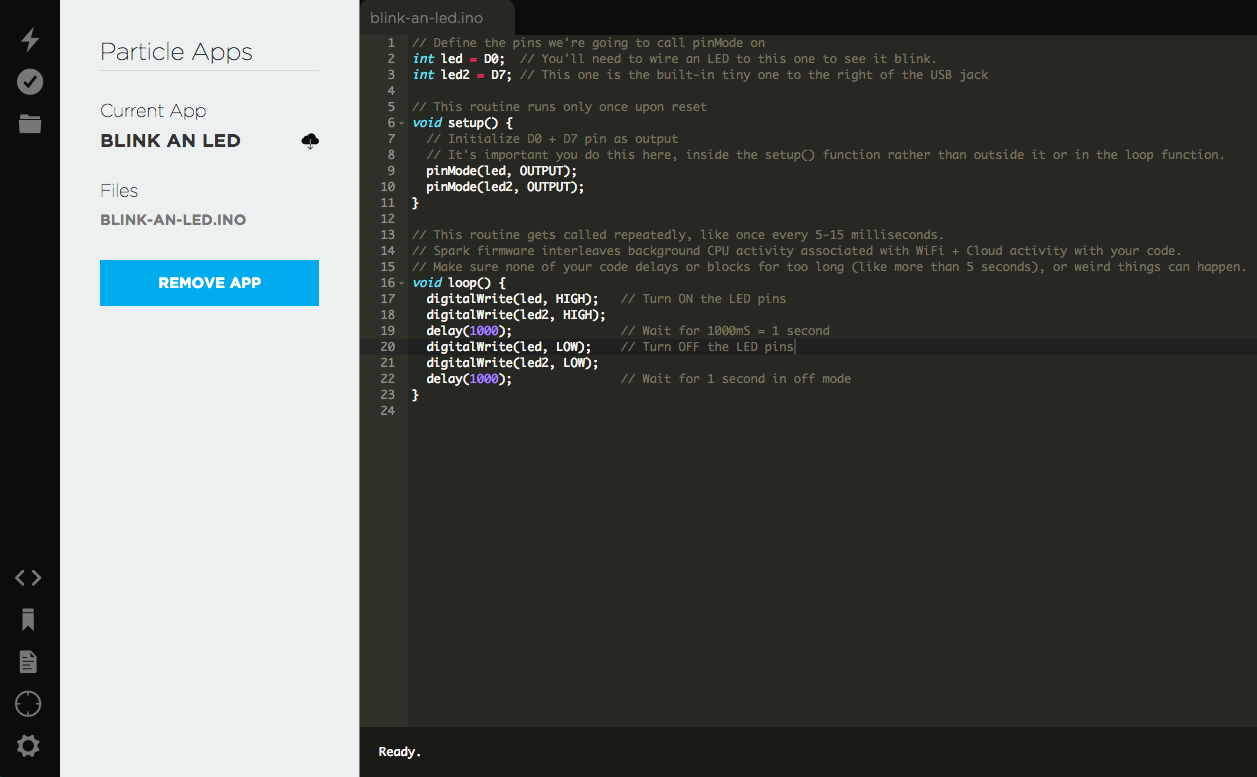
  1. Navigate to the particle build IDE.
      1. Click on the fourth row (Devices) and press the star in order to select the devices as preferred to flash.
      2. Clone our github repository about the Photon Particle. Feel free to reproduce our example or change the code at your own.
    #include "MQTT/MQTT.h"
    
    void callback(char* topic, byte* payload, unsigned int length) {
        // MESSAGE HAS ARRIVED FROM THE THETHINGS.IO
        String text = "";
        for (int i = 0; i < length; i++)
            text.concat((char)payload[i]);
        Serial.println(text);
    }
    
    MQTT client("mqtt.thethings.io", 1883, callback);
    
    int a;
    String TOKEN = "YOUR TOKEN";
    String TOPIC = "v2/things/"+TOKEN;
    String WIFI_SSID = "your wifi";
    String WIFI_PASSWORD = "your password";
    
    void setup() {
        pinMode(D1,INPUT_PULLDOWN);
        digitalWrite(D1, LOW);
        WiFi.on();
        WiFi.setCredentials(WIFI_SSID, WIFI_PASSWORD); 
        while(!WiFi.ready()) {
            Serial.print(".");
        }
        Serial.println("");
        Serial.print("Connected ssid");
        while (!client.connect("photonclient")) {
            Serial.println("Could not subscribe, retrying...");
        }
        client.subscribe(TOPIC);            // SUBSCRIBE TO RECEIVE CHANGED VALUES FROM YOUR RESOURCES
    }
    
    void loop() {
        a = random(0,10);
        if (digitalRead(D1) == HIGH) {
            message = "{\"values\":[{\"key\":\"fun\",\"value\":"+String(a, DEC)+"}]}";
            client.publish(TOPIC, message);
            delay(5000);         // ADDED A LITTLE BIT DELAY TO REDUCE BOUNCES
        }
        if (client.isConnected()) {
            client.loop();
        }
        
    }
    
    1. Flash the code into the Photon using the thunder icon (top left section).
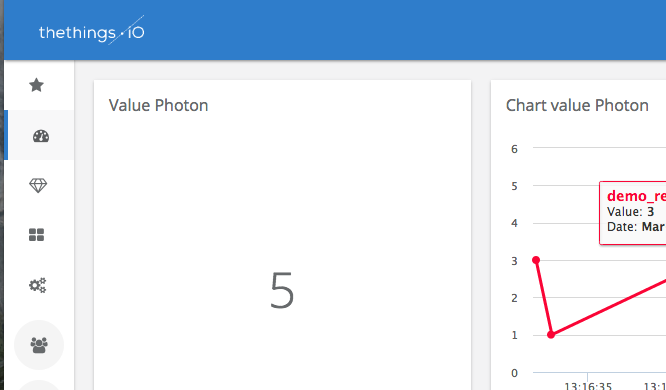
  2. Create a thethings.iO dashboard: Now it’s time to create a dashboard in your thethings.iO account to show all the values sent by the Photon. Lets create some charts:
    1. Click on the Add Widget blue button.
    2. Give a name to the Widget.
    3. Select Thing Resource inside Data Source.
    4. Select thing you just created before.
    5. Select the name of the resource you want to display and the format (pie, chart, graph…).
    6. Click on Costumize it and select the number values you want to show.
    7. Accept and Save!

thethings-particle-post-dashboard

Repeat this last step to build awesome dashboards with thethings.iO!