How to Setup your Insight Dashboard
 When you log into your thethings.iO IoT platform, the first thing that you see is your Main Dashboard. This dashboard is here to give you the main overview of all of your things. However, sometimes you need to see more specific information about your things. For this reason, we’ve created the Insight Dashboard feature. If you need to see a high level vision of all your IoT project but then deep-dive into the details of one specific thing don’t miss this tutorial. Let’s see what it’s all about!
Main Dashboard and Insight Dashboards in more detail
The Main Dashboard is where you can see broad information about all of your products.
You can create widgets that give your information about a product. However, if you want a dashboard that gives you a closer look into something, you can create an Insight Dashboard. For example, you may want to set up an Insight Dashboard that gives you a closer look at errors. Say you have a table on your Main Dashboard with errors. Now with your Insight Dashboard built, you can click on the “thing” with the error in the Main Dashboard and it will take you directly to that “thing’s” Insight Dashboard. You can create Insight Dashboards under each product.
The difference between products and things
For the purposes of thethings.iO, “Products” are the categories and “things” are the actual things that you have. For example, if you had a set of GPS trackers that would be the “product”, and each GPS tracker would be a “thing”.
The Insight Dashboard is a template, and the template can be used for whatever “things” you choose. This means you can specialize as much or as little you want, pulling up every “thing” under one template or pulling each “thing” up under its very own template.
Example: You have a bunch of buttons with different data, either gsm cell data or gps data. Here, your product is “buttons” and each button is one “thing.” Let’s say you wanted to use a different Insight Dashboard depending on the source of data the button uses. Then you need two Insight Dashboard templates, one for gsm cell data and one for gps data, so that you can customize each Insight Dashboard template by data type. Then when you click on each thing, the thing (which knows by what it’s tag tells it) will go to its specific Insight Dashboard.
Creating Insight Dashboards
To create an Insight Dashboard, go to “things” in the sidebar and then click details on one of the products you see there. Once there, midway down the page, you will see a section that says “Insight Dashboards”. There, you can click “+Create Dashboard,” and don’t worry, you can have as many Insight Dashboards as you want!
Adding widgets to your Insight Dashboard
Next click action>edit on the Insight Dashboard you want to edit.
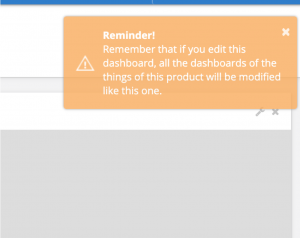
An alert like this will probably pop up here reminding you that this dashboard is a template, thus whatever you change will affect how you view every “thing” using this template.
When you first open your brand new Insight Dashboard, it will have autogenerated a sample for you(with sample data as well) to show you many of the features available. You can go through and delete these if you like. In addition, when editing or creating your Insight Dashboard, all the data you see is sample data.
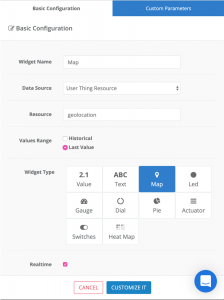
Now, let’s create a map to show you how you can personalize your dashboard.
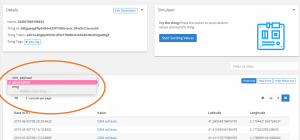
 Remember your “Resource” is what you see here under “things” in the side bar>details>a thing at the bottom of the page>details. For example, ctm_payload, geolocation, and msg are my options for resources for this “thing”:
 When you’re done editing your Insight Dashboard, don’t forget to save!
Connecting an Insight Dashboard to a widget on the Main Dashboard
Get the Insight Dashboard’s ID
Once you have created the dashboard, you will see it along with its unique ID appear there in the table of Insight Dashboards(things in the sidebar>details next to the product you would like>find the Insight Dashboard table midway down the page>copy the id next to the Insight Dashboard you would like to use). We will use this ID to link a widget on the Main Dashboard to your new Insight Dashboard.
Add The Insight Dashboard’s ID to a widget in the Main Dashboard
In the Main Dashboard that you can get to from the sidebar. Click the “edit dashboard” icon, then the wrench icon in the top, right corner of your widget. Then, click “customize it” and scroll to the bottom. There you will see a spot to set the Insight Dashboard ID. Just paste the ID there, and click done!
Try it out!
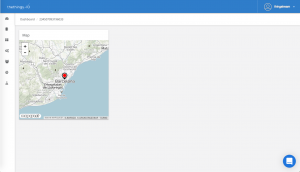
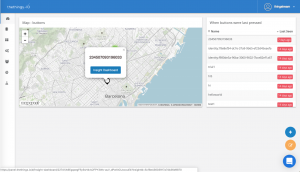 Now when you click on a thing in this widget, you will have the option to view more about this thing under the template of your Insight Dashboard. For example, I clicked on the white marker above, and now when I click on Insight Dashboard, it will take me to this following screen, which shows this “thing’s” data under the Insight Dashboard template we just created. Magic!
 I hope you enjoyed this tutorial! Feel free to contact us if you have any questions on thethings.iO IoT platform.

