, ,

thethings.iO IoT Blinders Retailer Manager

If you sell your digital product via distributors and retailers, thethings.iO’s Blinders are for you. The Blinders tool provides privacy and security to your retailers and suppliers and all their network of sub-retailers. Let’s learn more!
What is thethings.iO Blinders?

Imagine you are a thethings.iO customer with smart lightbulbs you wish to sell to retailers such as Walmart and Amazon. You sell 1 million lightbulbs to Walmart and Amazon. People then buy them and set them up with your app, giving you their email.

Now, when you will sell another product in the future, you will not need your retailers any more probably. You will sell directly to the customers through their emails and with marketing campaigns tailored to the clients of your current solutions.

This is obviously a problem for your retailers, who just lost customers, a lot. Most likely, your retailers would have realized this could happen and never would have made a deal with you in the first place. That means you never would have had any business to begin with either. So now what? How can you ensure privacy and security for your retailers? 

At thethings.iO, we have created a tool to solve this problem: the Blinders Retailer Manager. This tool “closes the blinds on you” to protect the retailer’s customers’ information and also lets you give the retailers a dashboard for them to manage your products. The Blinders tool also allows retailers to have a network of sub-retailers, each with their own dashboard.

For example:

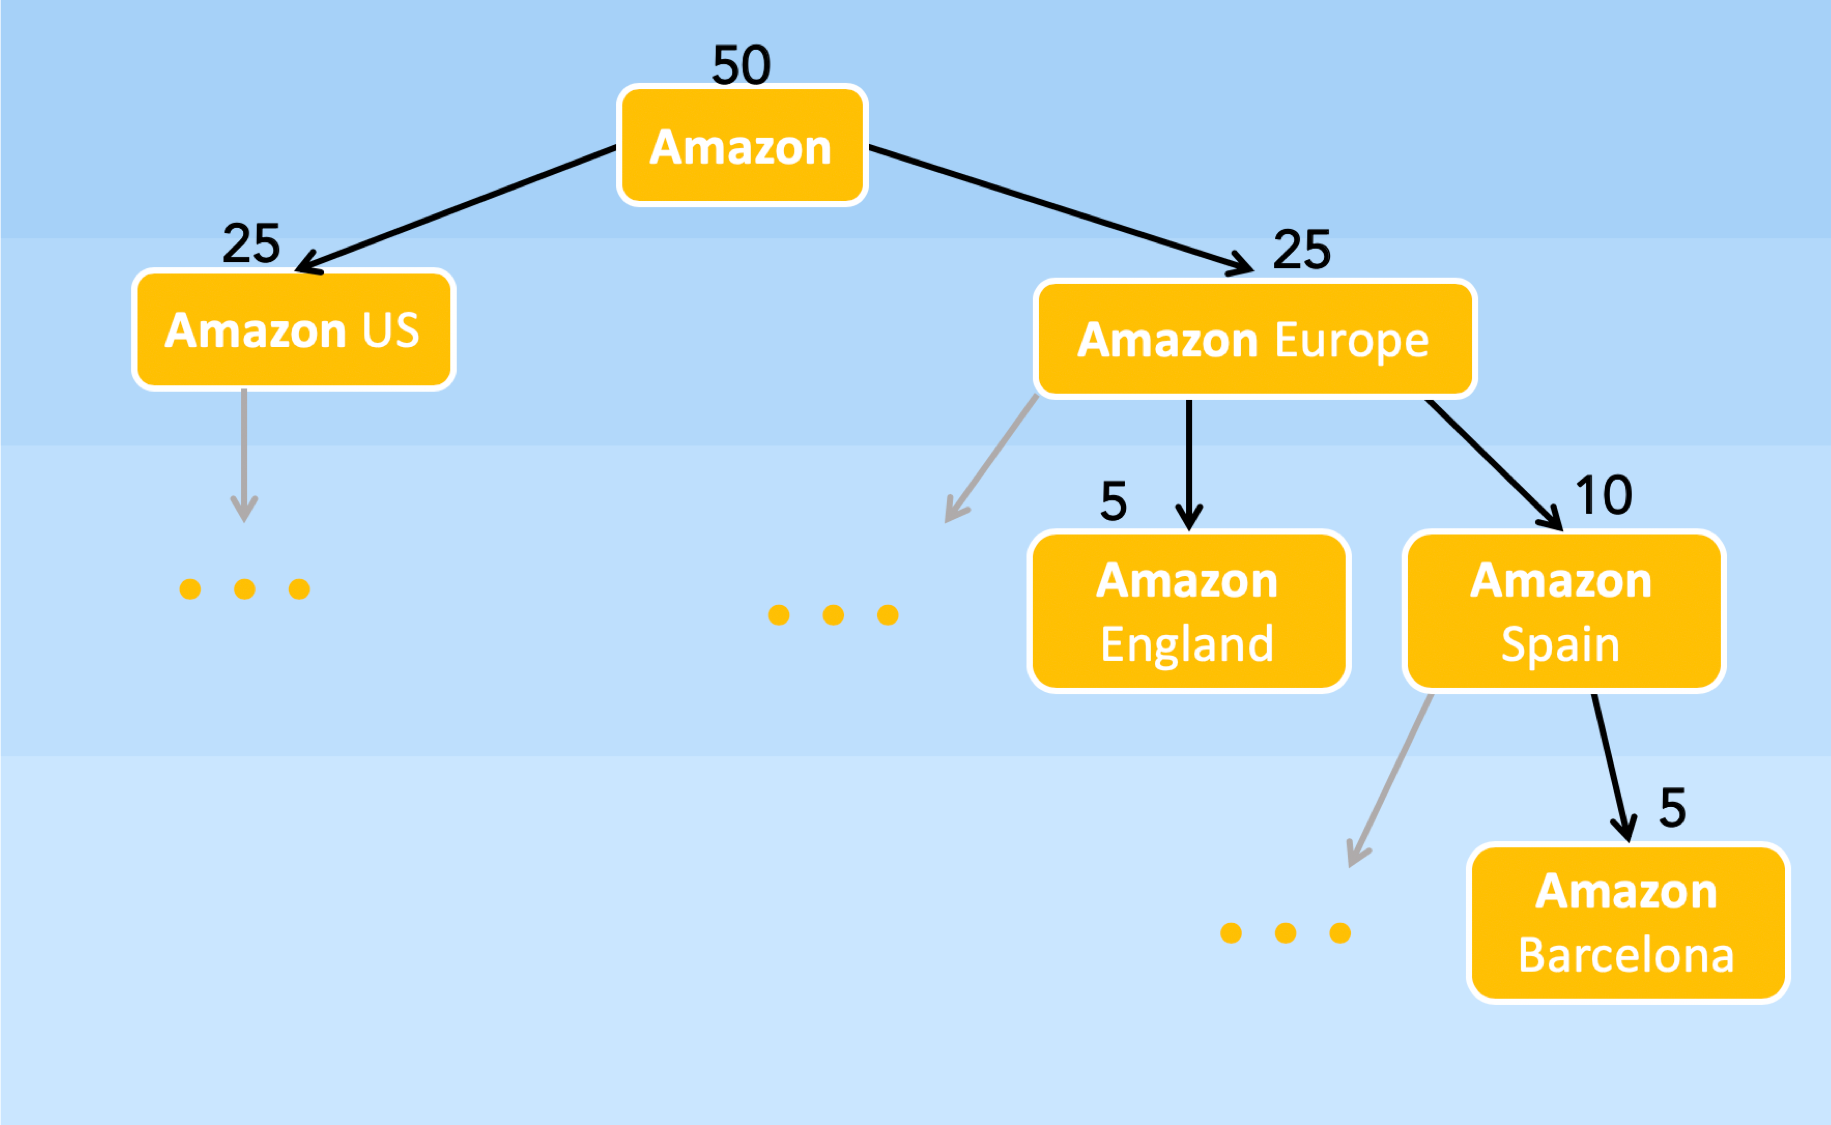
Now imagine you are Amazon. You have two branches, Amazon US and Amazon Europe. You have 50 products, 25 for each location, but you want Amazon US to see their only 25 and Amazon Europe to see their only 25. With thethings.iO’s 

Blinders, you can make them each their own separate login where they can only see their products.  Now, you are Amazon Europe and you want to give 10 products to Spain for only them to view. You can do the same thing, creating a tree like this one:
The thethings.iO Blinders solution for retailers is a very complete solution to empower your retailers and partners with a top-notch IoT solution.

Do you want to try it? Just contact us at hello at thethings.iO.

, ,

Using Geofencing with thethings.iO

What is geofencing?

Geofencing is a technology that allows you to create geographical boundaries and set up triggers based on location information.

For example, you could send a message to someone when a “thing” has entered or left a specific area defined by your geofence.

Some of the great uses of geofencing include location tracking, monitoring assets, alerts when assets enter/leave, monitoring turnaround time, and more!

Setting up geofences with thething.iO’s IoT platform

Creating geofences

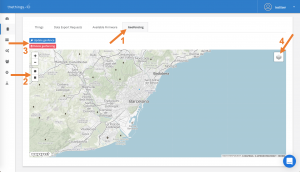
To create a geofence, go to “things” in the sidebar, then click on details next to one of your products (it does not matter what product, the geofence made under one will show up under the others). Then scroll down to the bottom of the page and (1)click the tab “Geofencing.”

Once there, you can (2)click either the polygon or the square to draw your geofence. If you choose polygon, remember to click the first point again to close the shape.

(3)If you select one of the shapes you have already drawn, you have the option to “update geofence” or “delete geofencing”.

(4)You also have the option to change the look of the map to best suit your needs.

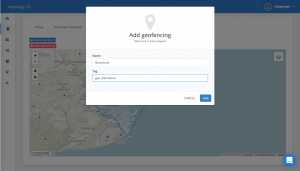
When you are finished drawing your geofence, you will be prompted to give it a Name and Tag. You can make the Name whatever you choose, but make sure the Tag is “geo_” followed by the location. For example, “geo_barcelona” (This format will make execution easier later).

Putting tags on a “thing”

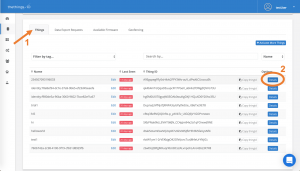
Now that you have a geofence, you will want to tag some of your “things” to that geofence. To do this, click back over to the (1)“things” tab, and (2)click details next to one of your things.

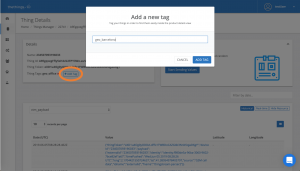
Next, click “+Add Tag”. Give this tag the same tag name as you gave to the geofence. For example, I will give this tag the name “geo_barcelona”, to tie this “thing” to my Barcelona geofence.


Making your geofences execute a Job

In order to use your new geofences, you will want to create a Job. Jobs are Javascript code that can be executed once every hour or once a day depending on what you set their Frequency to.

Creating a new Job

To create a new Job, go to “Cloud Code” in the sidebar, then find the section that says “Jobs” and click the “add job” button in the upper right. Give it a name, assign it to the correct product and set its frequency. Now, let’s talk about the code.

Understanding this Job

Here, I have provided an example and explanation of what your Job could look like to get your geofences working.

Overview: This Job goes through all of your “things” under a product and compares their “geo_” tags to the geofences you have made to check if your “thing” is inside/outside one or more geofences. If it is inside/outside one or more geofences, it will send an email to you saying what geofences your thing is inside/outside and it will update any widgets that are using the “alert_inside-outside” resource we will talk about later.

This Job has four functions: job, getGeofences, checkPosition, and checkInsiders.

job: Makes all your “things” under this product available to work with in the rest of the helper functions and calls the helper functions

getGeofences: Makes your geofences avaliable to work with

checkPosition: First, checks to see if a “thing’s” tag matches any of the geofences’ tags. For every match, it checks to see if the “thing” is inside/outisde that geofence. If so, it writes that to the geofencesInside/geofencesOutiside array, respectivaly. It does this for every “thing” under this product.

checkInsidersOutsiders: checks to see if a thing is inside/outside a geofence using the geofencesInside and geofencesOutside arrays you just created. If so, creates a resource that says what geofences the “thing” is inside/outside, and creates a strings of all the geofences a thing is inside/outside and sends this string in an email. It does this for every “thing” under this product.


function job(params, callback)
{
 async.waterfall([
    thethingsAPI.getProductThings,
    getGeofences,
    checkPosition,
    checkInsidersOutsiders
 ], function(err, res) {
    if (err) return callback(err);
    callback(null, res);
 }); 
}


function getGeofences(things, callback)
{
 async.eachLimit(things, 10, (thing, next) => {
    thethingsAPI.getGeofences(thing.thingToken, (err, geofences) => { 
       if(err) return next();
       thing.geofences = geofences;
       next();
    });
 }, (err) => {
 callback(null, things);
 });
}


function checkPosition(things, callback)
{
 console.log("======== CHECK POSITION =========");

 async.eachLimit(things, 10, (thing, next) => { 
    thing.geofencesInside = [];
    thing.geofencesOutside = [];

    if(!thing.hasOwnProperty('tags') || !thing.hasOwnProperty('geofences')) return next(); 
    if(!thing.description.hasOwnProperty('geo')) return next(); 
    for(let i=0; i<thing.tags.length; i++){ 
       if(thing.tags[i]._id.startsWith("geo_")) { 
          for(let j=0; j<thing.geofences.length; j++){ 
             if(thing.tags[i]._id === thing.geofences[j].tag.toLowerCase()){ 
                if(geolib.isPointInside({latitude: thing.description.geo.lat, longitude: thing.description.geo.long}, thing.geofences[j].points)){ 
                   thing.geofencesInside.push(thing.geofences[j]); 
                   console.log("INSIDE --> "+thing.geofences[j]);
                } 
                else
                {
                   thing.geofencesOutside.push(thing.geofences[j]); 
                   console.log("OUTSIDE --> "+thing.geofences[j]);
                }
             }
          }
       } 
    }

    next();
 }, (err) => {
 callback(null, things);
 });
}


function checkInsidersOutsiders(things, callback)
{
 let resultInside = [];
 let resultOutside = [];

 console.log("##### CHECK INSIDERS & OUTSIDERS #####");
 
 async.eachLimit(things, 10, (thing, next) => {

    if (thing.geofencesInside.length > 0)
    {
    console.log("this thing is inside of a geofence");
       var txt_geofenceInside = "";
       for (let i=0; i<thing.geofencesInside.length; i++){
          if (txt_geofenceInside!= "") txt_geofenceInside +=", ";
          txt_geofenceInside += thing.geofencesInside[i].name;
       }
       thing.insideFences = txt_geofenceInside;
 
       console.log("WRITE RESOURCE");
       resultInside.push({
          key : 'alert_inside-outside',
          value : "Inside: "+txt_geofenceInside
       });
       thethingsAPI.thingWrite(thing.thingToken, { values: resultInside }, {lib:'panel'}, next);
    }
 
 
    if (thing.geofencesOutside.length > 0)
    { 
       console.log("this thing is outside of a geofence");
       var txt_geofenceOutside = "";
       for (let i=0; i<thing.geofencesOutside.length; i++)
       {
          if (txt_geofenceOutside!= "") txt_geofenceOutside +=", ";
          txt_geofenceOutside += thing.geofencesOutside[i].name;
       }
       thing.outsideFences = txt_geofenceOutside;
 
       console.log("WRITE RESOURCE");
       resultOutside.push({
          key : 'alert_inside-outside',
          value : "Outside: "+txt_geofenceOutside
       });
       thethingsAPI.thingWrite(thing.thingToken, { values: resultOutside }, {lib:'panel'}, next);
    }
 
    if (txt_geofenceInside !== undefined || txt_geofenceOutside !== undefined) {
       console.log("thingToken: " + thing.thingToken + ", Inside: " + thing.insideFences + ", Outside: " + thing.outsideFences);
    }
 next();
 }, (err) => {
 callback(null, things);
 });
}

Testing your Job

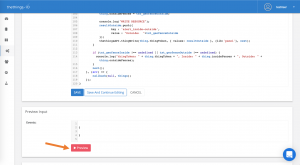
If you want to run some tests manually, you can click on Developers in the sidebar>Developer’s Console. Now on the edit screen for your Job, scroll down and find the button “Preview“.

Click this, and all of your logs will show up in your Developer’s Console. You will also see new data on your geofencing widget in your Insight Dashboard which we will set up next.

Geofencing with your Dashboards

Your geofences will automatically show up on the maps in your main dashboard.

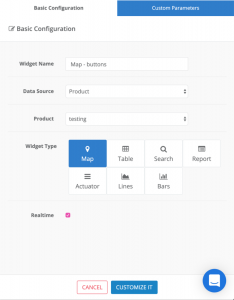
You can create a map by doing the following:


If you have an Insight Dashboard set up with your map widget, you can click on one of the “things” to get a closer look.

For more information on the magic of Insight Dashboards, check out this blog post.

Now, let’s make a widget on our Insight Dashboard that shows us where this “thing” has been.

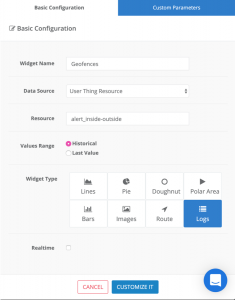
Once in the Insight Dashboard you wish to edit, click the add widget “+” icon, and do the following:

Note: you don’t need to click Realtime, because the widget will update automatically every hour or every day depending on what you set the Frequency to in your Job.

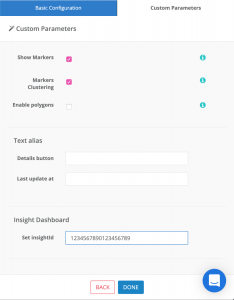
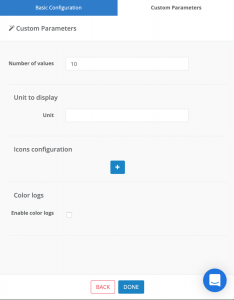
Under Custom Parameters, you may want to set a limit to the number of entries you will see in the widget. For example, I set mine to 10 values.


Don’t worry if the data looks odd; the data you see when editing an InsightDshboard is randomly generated because you are building a template.

Now save your Insight Dashboard and you are ready to use it!

When on your Main Dashboard, click on one of the “things” in the widget connected to this Insight Dashboard and you should see the results of where this thing has been in terms of the geofences you connected it to.


I hope you enjoyed this tutorial! Feel free to contact us if you have any questions on thethings.iO IoT platform.

, ,

How to Setup your Insight Dashboard

When you log into your thethings.iO IoT platform, the first thing that you see is your Main Dashboard. This dashboard is here to give you the main overview of all of your things. However, sometimes you need to see more specific information about your things. For this reason, we’ve created the Insight Dashboard feature. If you need to see a high level vision of all your IoT project but then deep-dive into the details of one specific thing don’t miss this tutorial. Let’s see what it’s all about!

Main Dashboard and Insight Dashboards in more detail

The Main Dashboard is where you can see broad information about all of your products.

You can create widgets that give your information about a product. However, if you want a dashboard that gives you a closer look into something, you can create an Insight Dashboard. For example, you may want to set up an Insight Dashboard that gives you a closer look at errors. Say you have a table on your Main Dashboard with errors. Now with your Insight Dashboard built, you can click on the “thing” with the error in the Main Dashboard and it will take you directly to that “thing’s” Insight Dashboard. You can create Insight Dashboards under each product.

The difference between products and things

For the purposes of thethings.iO, “Products” are the categories and “things” are the actual things that you have. For example, if you had a set of GPS trackers that would be the “product”, and each GPS tracker would be a “thing”.

The Insight Dashboard is a template, and the template can be used for whatever “things” you choose. This means you can specialize as much or as little you want, pulling up every “thing” under one template or pulling each “thing” up under its very own template.

Example: You have a bunch of buttons with different data, either gsm cell data or gps data. Here, your product is “buttons” and each button is one “thing.” Let’s say you wanted to use a different Insight Dashboard depending on the source of data the button uses. Then you need two Insight Dashboard templates, one for gsm cell data and one for gps data, so that you can customize each Insight Dashboard template by data type. Then when you click on each thing, the thing (which knows by what it’s tag tells it) will go to its specific Insight Dashboard.

Creating Insight Dashboards

To create an Insight Dashboard, go to “things” in the sidebar and then click details on one of the products you see there. Once there, midway down the page, you will see a section that says “Insight Dashboards”. There, you can click “+Create Dashboard, and don’t worry, you can have as many Insight Dashboards as you want!

Adding widgets to your Insight Dashboard

Next click action>edit on the Insight Dashboard you want to edit.

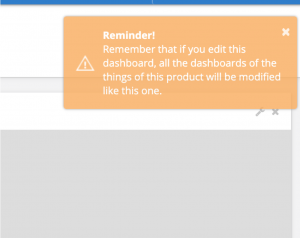
An alert like this will probably pop up here reminding you that this dashboard is a template, thus whatever you change will affect how you view every “thing” using this template. 

When you first open your brand new Insight Dashboard, it will have autogenerated a sample for you(with sample data as well) to show you many of the features available. You can go through and delete these if you like. In addition, when editing or creating your Insight Dashboard, all the data you see is sample data.

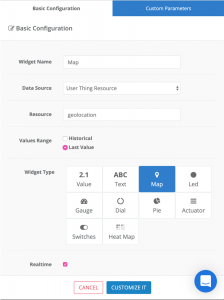
Now, let’s create a map to show you how you can personalize your dashboard.

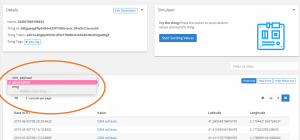
Remember your “Resource” is what you see here under “things” in the side bar>details>a thing at the bottom of the page>details. For example, ctm_payload, geolocation, and msg are my options for resources for this “thing”:
When you’re done editing your Insight Dashboard, don’t forget to save!
Connecting an Insight Dashboard to a widget on the Main Dashboard

Get the Insight Dashboard’s ID

Once you have created the dashboard, you will see it along with its unique ID appear there in the table of Insight Dashboards(things in the sidebar>details next to the product you would like>find the Insight Dashboard table midway down the page>copy the id next to the Insight Dashboard you would like to use). We will use this ID to link a widget on the Main Dashboard to your new Insight Dashboard.

Add The Insight Dashboard’s ID to a widget in the Main Dashboard

In the Main Dashboard that you can get to from the sidebar. Click the “edit dashboard” icon, then the wrench icon in the top, right corner of your widget. Then, click “customize it” and scroll to the bottom. There you will see a spot to set the Insight Dashboard ID. Just paste the ID there, and click done!

Try it out!

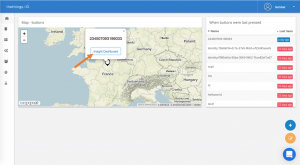
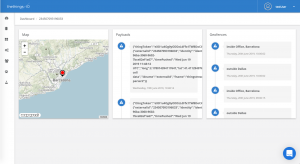
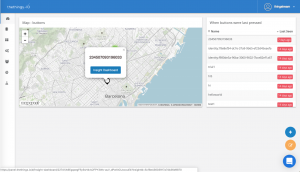
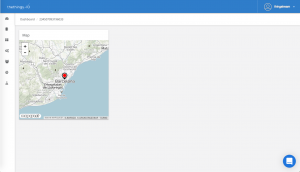
Now when you click on a thing in this widget, you will have the option to view more about this thing under the template of your Insight Dashboard. For example, I clicked on the white marker above, and now when I click on Insight Dashboard, it will take me to this following screen, which shows this “thing’s” data under the Insight Dashboard template we just created. Magic!
I hope you enjoyed this tutorial! Feel free to contact us if you have any questions on thethings.iO IoT platform.
, ,

How to connect Thingstream with thethings.iO

In this tutorial, we will set up a Thingstream Button with thethings.iO IoT platform so that when we click the button, it’s GPS location will be sent to thethings.iO and can easily be seen on a map! This tutorial will walk you through setting up your button, creating a flow in Thingstream, sending data to thethings.iO, and then visualizing your data with your thethings.iO insight dashboard.

Find here the video tutorial or scroll down in order to read the step-by-step.

Let’s get started!

First steps

Go to Thingstream and activate your button. Make sure your button says active next to it.

If it doesn’t say “active”, you can follow the steps here in a video on activating your button.

Then, click on the button and look at the “IMSI” number and the “identity” number, these are what we will use in the future to send the button’s specific id with it to thethings.iO.

Creating a thing on thethings.iO IoT platform

First, we must create a “thing” so that we can have a way to listen to our button.

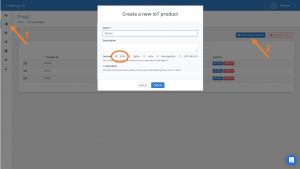
Go to “things” on the sidebar(1) and then click “Create new ioT product”(2). For this project, we will be using the JSON format.

Once your thing is created, click details and let’s take note of some things. In the top left corner, we see “Product ID” and “Hash”.
These are what we will use in the http request to tell Thingstream to send the information to this “thing” on thethings.iO.

You can learn more about http/s and JSON here in a past blog post.

Creating a flow on Thingstream

For this project, it will be best to begin with a template so, within Thingstream’s site, click on flows > create flow > from flow library > Thingstream button > Email CSDK Tracker Lctn. This flow will give us a starting point. You can change the name if you want, and then click edit to personalizing it!

Make the flow look like the following by putting “http request” where “location mail” is and adding “msg.payload” to help you with troubleshooting later. 

Understanding the flow

Now, let’s take a closer look at the flow. What kind of data the “GPS or GSM” node takes in, either GPS data or GSM cell data, will affect which path the flow takes. In each path, we are going to organize our data with a msg.payload that we can send with our http request to thethings.iO.

Organizing the data

Next, let’s change the “Prepare GPS…” node. We will add in “externalId”, “identity”, and “timePushed”. The first two will identify what button was pushed and the later will tell when it was pushed. You can also delete the addition of the url if you choose because thethings.iO will offer you with an even better, more functional map :).

Tip: If you are extra curious and want to see what values are available to you in “msg”, you can change your Id value(here “externalId”) to msg and see what it prints when it comes up in thethings.iO.

var gps = msg.payload['gps-location'];
var lon = gps.lon;
var lat = gps.lat;
var source = 'GPS';
msg.payload = {
 "externalId":msg.messageOrigin.externalId,
 "identity":msg.messageOrigin.entityId,
 "timePushed":msg.created, 
 'long':lon,
 'lat':lat,
 'source':source
};
return msg;

We will make similar changes to the “prepare GSM…” node.

var lon = msg.payload.longitude;
var lat = msg.payload.latitude;
var source = 'GSM cell data';
msg.payload = {
 "externalId":msg.messageOrigin.externalId,
 "identity":msg.messageOrigin.entityId,
 "timePushed":msg.created, 
 'long':lon,
 'lat':lat,
 'source':source
};
return msg;

Making the http request

Finally, that leaves the “http request” node. For this one, make sure the method is set to POST and the return is “a parsed JSON object”. For the url, we will follow this pattern:

https://subscription.thethings.io/http/{productId}/{hash}?idname={idname}&fname={fname}

Remember your productId and hash will come from your thing on thethings.iO site. The “idname” we will set to “externalId” and the fname will be the name of our function (which we will write next); let’s call it “thingstream-parser”. Thus, your url should look something like this:

https://subscription.thethings.io/http/123456/hashhash?idname=externalId&fname=thingstream-parser

You can learn more about http/s and JSON here in a past blog post.

Creating a function for your “thing”

To create a function, go to thethings.iO site, and click “cloud code” in the sidebar. Then click “Add Function”.

Once here, give the function a name. It must be the same one as you used in your http request so in our case, that’s “thingstream-parser”. Then, assign your function to a “thing”, this should be whatever “thing” you have been using to represent your button on thethings.iO site.

Now, change the code to look like this:

function main(params, callback){

var result = [
 {
 "key": "geolocation",
 "value": params.payload.source,
 "geo":{
 "lat": params.payload.lat,
 "long": params.payload.long
 }
 },
 {
 "key": "$geo",
 "value" : {
 "type": "Point",
 "coordinates": [params.payload.long, params.payload.lat]
 }
 }
];
callback(null, result);

}


More on the $geo and geo keys can be found here in one of our previous blog posts about how to geolocalize things on a map.

You can also include a console.log of the payload which you will be able to see in the “developer’s console” (“developers” in thethings.iO sidebar > “developer’s console”) every time you click your button.

Testing your button

Deploying the flow for your button

We’re almost ready to click the button! Let’s deploy our flow. Make sure you are looking at your flow on the Thingstream site, then in the upper right corner find and click Deploy > Deploy Test > A Thing > then your button > Deploy.

Click the button!

We’re now ready to click the button! It may take some time for the button to send the http request after being clicked so be patient and let it do it’s thing :). Usually you will see the color green when it is first clicked, then yellow when it is trying to make a connecting, blue when it has made then connection and finally pink when it is talking to the server. If all goes well it will let out a cheerful “beep!” and flash green to tell you that it’s done. At this point, you should see the message

"{"status":"success"}"

in the debug window of your flow.

Reading your data on the thethings.iO site

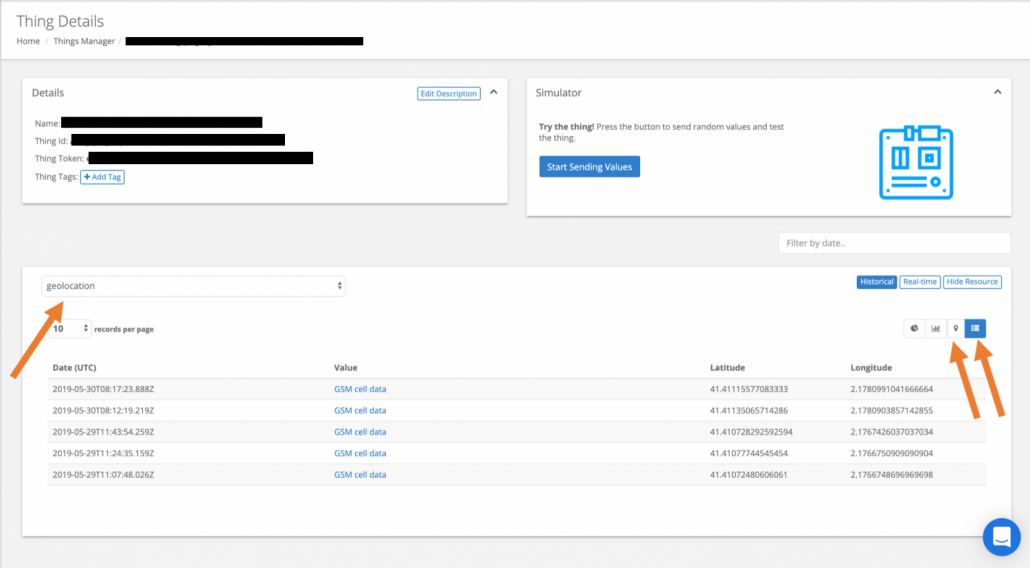
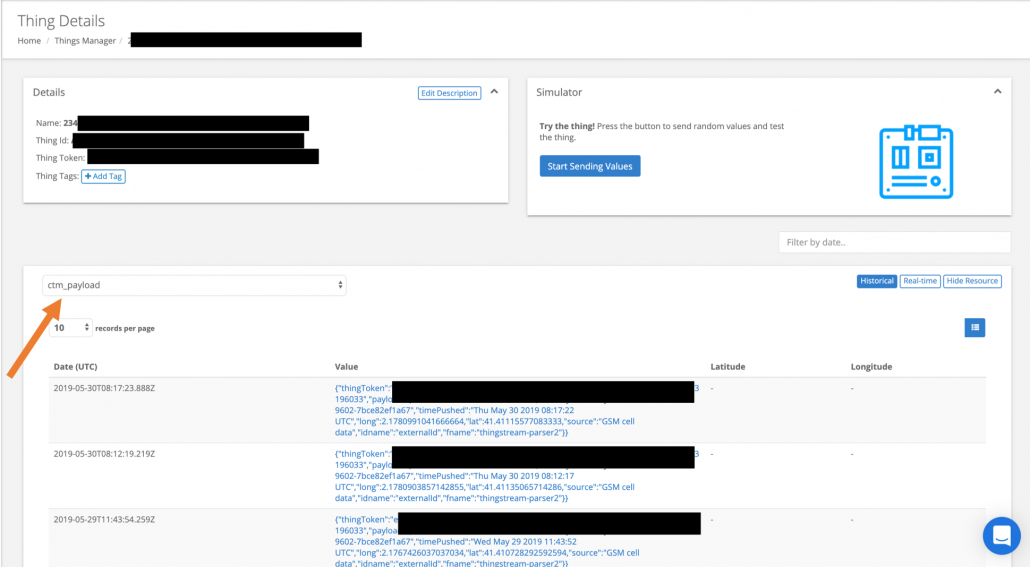
To get to your data, click on “things” in the sidebar, find your “thing” and then click “details”. Towards the bottom of the page, you should see your IMSI number from the button there under “Names”. Click “details”. Now you should see a screen like this.

Under “ctm_payload”, you can see all the payload messages you sent with your button.

Under “geolocation”, you can view the map, or view the list view.

Personalizing your button data with thethings.iO dashboard

First, let’s create a map of all of our buttons under our Button “thing”.

On “Customize It”, you may want to change map-type and enable polygons(this will make the map have arrows that show you in what direction the button has traveled).
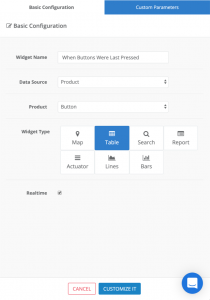
Now, let’s create a table that shows when each button was last pressed.

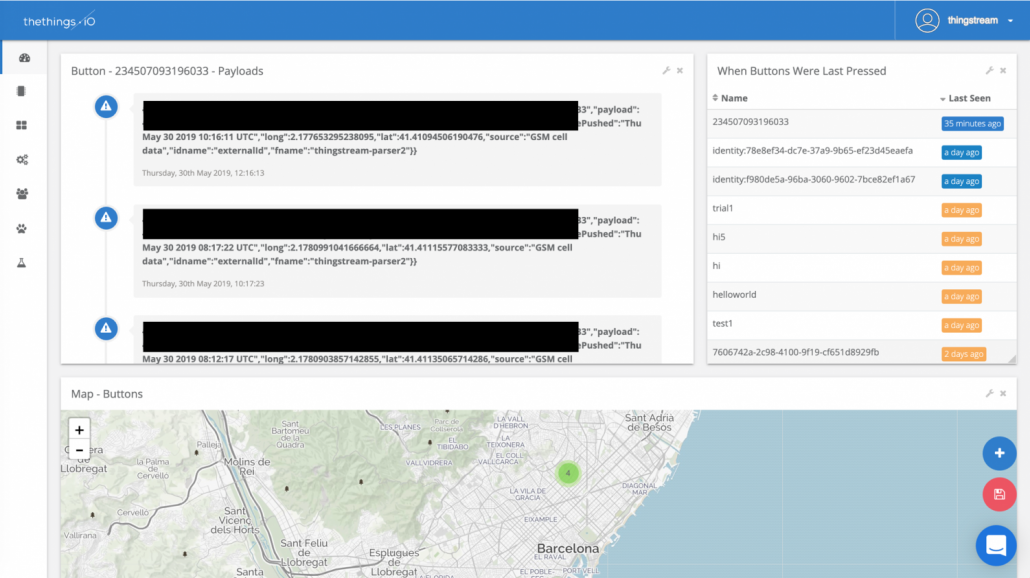
Here’s what we have so far! These are just a few examples of all the cool things you can do with your insight dashboard. Feel free to explore some more!
Here are a couple link’s to some tutorials for customizing your dashboard even more:

I hope you enjoyed this tutorial! Feel free to contact us if you have any questions on thethings.iO IoT platform.

,

The power of the IoT Bra

The Power of the IoT Bra

The Power of the IoT Bra

Both men and women will enjoy this post about the latest news in the IoT field because today I’m writing about Bra. Yes, you’re reading it right. Recently, looking into the clothing world I ran into the most intimate wearables for women. I’m talking about Bra again. If it looked liked the most common piece to hold women’ breasts, the IoT world has run further.

Victoria’s Secret joins the wearable revolution

When somebody tells you that Victoria’s Secret has decided to take part of the IoT world, you just get crazy. Is that true? You may ask yourself. I’m going to answer rapidly: yes, it’s true and awesome! The biggest lingerie company has its own connected sports bra. It is called Incredible Bra and the firm introduced it to the world the last 2014. Watch the video with the most famous Angels:

Incredible is great for tracking your heart rate during high-intensity workouts, such as kick-boxing, running or even hard yoga! The bra places electrodes inside that attach to a heart-rate monitor (which is not included), to save the most accurate information about your heartbeats.

Sensilk Flight Tech Sports Bra is another option to all fitness lovers. Its sensors, built into the bra, are sync to wearer’s smartphones, so it tracks heart rate, calories burned, duration, distance, days since the user’s last workout and even more! The substitute of FitBit bracelets is in town, acquiring the shape of a sports bra!

IoTT: Internet of Topless Things

If we flash back to the 15th Century, the best option to preserve “true and unique love” (consider love as sex) was the chastity belt. What happens when living in the year 2015, having all the technology near us? Well, there are no more iron chastity belts, luckily! But if you want to avoid some guys to touch your intimate parts, specially breasts, there’s a design that’s perfect for you: the True Love Bra. Designed by Ravijour, a Japanese lingerie brand, this bra just opens when you find true love.

The True Love Bra places a sensor into the bra which detects the wearer’s heart rate and sends it to a special smartphone app for analysis via Bluetooth. The app calculates the “True Love Rate”, according to the changes in the heart rate over time. When this rate exceeds a certain value, the hook opens. The best way to turn the intimacy even more intimate!

But what most men will thank is the bra that opens when clapping your hands. The worst situation a man must face is when he’s trying to unbutton women’ bra, so it turns to be really, really easy. It is called The Clap-Off Bra, but you, all men around the world, should call it God. Watch how it works:

Say hello to the most sociable bra…

Fitted with a sensor that contains a Bluetooth transmitter, which is placed in the bra’s clasp, the #tweetingbra was a Nestlé idea in contest of the Breast Cancer day. Each time the clasp was unhooked and the connection is broken, it sent a signal to the user’s mobile device. Then a tweet like “Don’t forget to check your breasts women #tweetingbra” is sent from the Twitter account @tweetingbra to remind you to check your breasts in order to prevent from a possible breast cancer. Check its profile and give support to this campaign.

… and to the one that detects cancer!

There’s more in the health & bra field! First Warning Systems has developed a revolutionary technology that could change the way doctors diagnose breast cancer. The new tool you have to use is a bra. This bra provides a continuous screening of breast tissue under a women’s clothing. All data generated is sent digitally to a doctor, who can assess it to detect the early stages of a tumor.

Be your own energy source to connect your devices

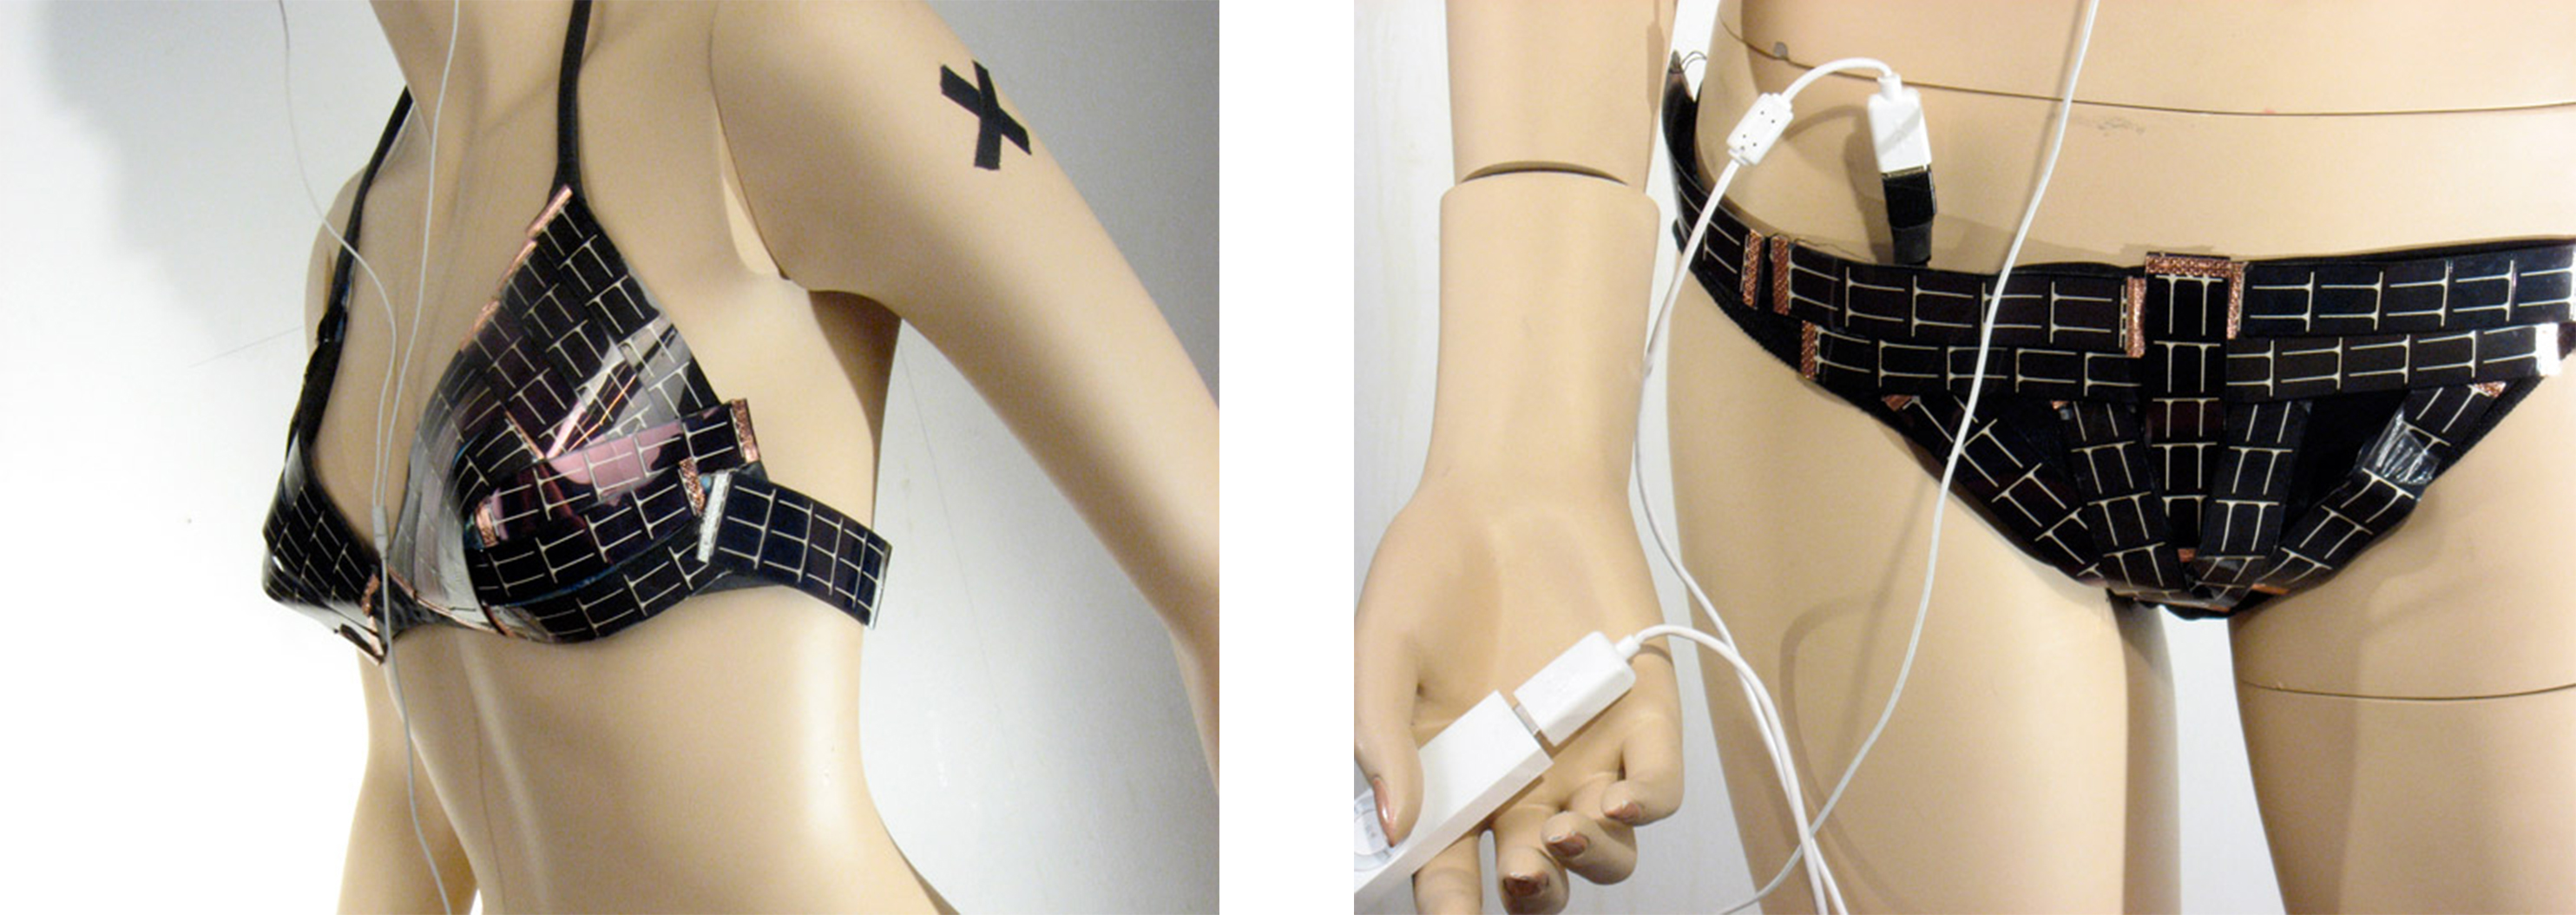
Okay, not exactly yourself, but a wearable that actually do that. Say thanks to the Solar Bikini, designed by Andrew Schneider. This bikini is capable of charging your smartphone or MP3 player. How? It comprises flexible photovoltaic film strips and USB connectors, so say goodbye to that awkward moment when you need to send an important (or maybe not that important) message and there’s no more battery! We are not sure of its comfortability, but it will, for sure, change the reason why to sunbathe.

The Solar Bikini

The Solar Bikini

To get a great tan seems a must during the summer. Most women and men love to see their skin turn into a gold colour during their summer holidays. Contrarily, skin cancer statistics has increased considerably in the past years. Nobody wants to get that “red-skin colour”, so to avoid that, we all should wear sunscreen. But when do you need to apply it? No more worries! Spinali bikini will tell you exactly when to put on your sunscreen (or stop sunbathing) thanks to an UV sensor that connects directly to your smartphone. It works for all kind of skins and the tanned level you want to get.

Hey, but if you want to wear a Solar Bikini (or any other kind) maybe you are thinking about starting one of those famous summer diets. But well, IoT has the solution you were looking for. It comes from the hand of the big Microsoft, and it is also a bra! This bra pretends to prevent women from emotional and stress eating. It consists in an electrocardiogram to measure your heart rate and an electrodermal activity sensor, which measures skin conductance and movement. With these sensors you are capable to measure your stress level, so the computer sends an alert to your smartphone app, which tells you to stop what you’re doing (you’ll be probably taking “one more” chocolate) so you won’t overeat.

The Role of thethings.iO

At thethings.iO, we connect devices or wearables such as the ones we have mentioned in this post to the Internet. We are a Cloud solution for companies that decide to build new cool things that can be connected to improve our lives. If you want to know more about us, you can create an account by clicking here, sign up to receive our monthly newsletter or follow us on Twitter! Stay tuned and be the first in knowing the latest news of the IoT world and thethings.iO.

, ,

thethings.iO at September 2015

With the arrival of September, holidays end for most of us. And with its end, our team comes again with their batteries fully charged. Charged to accomplish new goals, attend more IoT congresses, events and conventions and work harder than ever to respond any of your requests, suggestions at thethings.iO.

So what’s this September bringing to us?

The first week of September thethings.iO will be in Berlin. First, our CEO will speak at the IoTCon in Berlin. Our CEO, Marc Pous, will speak at 2 sessions about CoAP and IoT platforms the 2nd of September.

Connected things at IFA Berlin

Connected things at IFA Berlin

The 4th of September, we will attend the IFA’s event in Berlin, which will gather lots of technological, M2M and IoT companies from around the world in just one place. Some of the most important of them are Intel, EPSON, Yamaha or SONY, among others.

The next event will take place in our city: Barcelona. It is the IoT Solutions World Congress that will last from 16th to 18th September. At this event, thethings.iO will have a booth where you will be able to see our technology and IoT prototypes working in real-time. This event will be more than a simple congress, so it offers networking opportunities with companies such Intel, Microsoft, Vodafone or IBM, among others, as well as some different Marketplace options. If you are in the city, do not hesitate to visit our stand in the IoT Solutions World Congress!

Introducing you to thethings.iO

We are an IoT cloud platform for companies that decide to build new cool things that can be connected to improve our lives. If you want to know more about us, you can create an account by clicking here, sign up to receive our monthly newsletter or follow us on Twitter! Stay tuned and be the first in knowing the latest news of the IoT world and thethings.iO.

,

Welcome to children’s IoT world

children IoT world

Imagine sitting in your kitchen trying to find something on your iPad. For some reason you just can’t imagine where you have left whatever you are looking for, all of a sudden your 6-year-old child to your left makes a hand movement and the item starts beeping so you can find it.

To the technologically savvy, making new technology work is as easy as riding a bike but from an outside point of view it is mind-blowing the differences we have seen transpire.

The Internet of Things will change the way children understand, not only the technological world, but also how the whole world will understand. Stop looking for your kid inside that big Supermarket. All you will need is your smartphone and in a second you will know exactly the position of the little guy. The hide and seek game will end as soon as you want.

Tracking children, anywhere, anytime

In the IoT world, most children’s watches have become trackers as well, which makes it the best sold wearables for kids. Hidden within something as simple as a watch, and giving no hints to the unknown eye, the parents are able to feel calm and secure knowing when their kids try and runoff. The hereO GPS watch is equipped with WiFi, a built-in SIM card and built-in USB connector that allows parents to keep track of their children’s location at any time in real-time, just by using the hereO family app. The hereO is able to fit on any kid’s wrist. Designed to support even the heaviest of play (including water games). It notifies parents when the battery is low by sending a message to their smartphone.

hereO

hereO


What about if you want to know more about how your kid is doing and not just his location? Are they safe? Then you should consider purchasing a wearable with even more functions! For example, a FiLip. More than a GPS watch, FiLip can make and receive calls rom five different numbers that can be preprogrammed. If the child is ever in distress, he/she simply needs to hold down one button for four seconds and an emergency call is dispatched. FiLip uses a blend of GPS, GSM and WiFi for the location function, so it allows parents to know where their children are even if they are outside. Parents can see their child’s location on a map at any time. You can also choose SafeZones (virtual radius around a location), so when the child has entered or left a SafeZone, a notification is sent to his/her parents.

Otherwise, we find wearables like Trax, which works similar to FiLip but adopting another aspect. Trax is a GPS-Tracker with which you can create as many Safe Zones as you want, allowing you to know exactly where your kid is at any time. Its opportunities go from Augmented Reality to Speed Alerts, going through Geo-fences (Safe Zones), Proximity fence, History view, Scheduling and Multiple Devices & Sharing’ options. All fitted in a small square device.

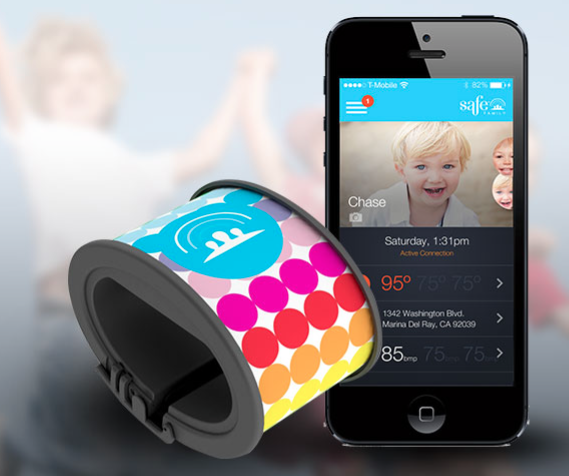
SAFE Family wearables has designed Paxie, a tracking band for children. It is similar to HereO and FiLip, but looks like a bracelet, it tracks your kid’s movements and location… and more! It also monitors in real time the ambient temperature, daily activity, heart rate, etc. All with a cool and interchangeable design to fit to any kid’s style.

Paxie by SAFE Family

Paxie by SAFE Family

Healthy children

Safety is as important as health is. That’s why the IoT devices have delved into this world as well. Kinsa Smart Thermometer, is a new concept of thermometer that sends data to your smartphone. It is very easy to use (kids can also use it by themselves). You just need to put the Kinsa in your mouth and your smartphone will do the rest. Which symptoms do you have? Kinsa helps you to discover what is happening to you in real-time. This can be useful to track your illness progression and then, to keep a record for you and your doctor.

Kinsa Smart Thermometer

Kinsa Smart Thermometer

On the other hand, Fever Smart is a disposable patch that monitors body temperature and transmits data in real-time to your smartphone. You are able to receive alerts when the patient’s temperature begins to rise or actually reaches unsafe levels. It is normally used by parents to control their kids temperature, but it has other uses. It can be used to take care of patients in a post-operative situation, or to track an Ebola outbreak!

The Role of thethings.iO

At thethings.iO, we connect devices or wearables such as the ones we have mentioned in this post to the Internet. We are a Cloud solution for companies that decide to build new cool things that can be connected to improve our lives. If you want to know more about us, you can create an account by clicking here, sign up to receive our monthly newsletter or follow us on Twitter! Stay tuned and be the first in knowing the latest news of the IoT world and thethings.iO.

,

To All First-Time Mothers: Your Troubles Solved by IoT

IoT for babies

To all desperate first-time mothers, the Internet of Things is going to save your lives, or at least, it will try to. Say goodbye to all the crying without knowing what is actually happening. In the very near future, to take care of a baby will be, maybe, one of the easiest things of your life. Do you want to know how? Know the latests IoT wearables and devices in this post!

Track Your Baby’s Vitals

Fitbit was for sports, Fitbark for dogs and Revolar for women. Which is the wearable for babies then? Lately, lots of companies have seen a space in which they can develop their businesses for the house’s youngest. The baby world has been an attractive field to get into since it not only helps couples in their first years of being parents, but also because it has a lot to offer. From the simplest toys to baby buggies, bottles or carriages, couples (and also singles) need to buy it when they decide to expand the family.

It is 2AM and the baby is up, crying, we do not know why, or we did not know why? Mimo is a baby monitor tracker that sends all the information about your baby’s vitals to your smartphone. It takes the shape of a turtle, which is what sends the information about your baby’s breathing, body position, sleep activity and skin temperature. All that data generated is streamed to the cloud to let you know real-time insights about your baby on your smartphone. Mimo makes the understanding between parents and babies easier.

Similar to Mimo, we find other companies such as Sensible Baby, which also monitors the baby’s position, temperature, and movement on your smartphone while he/she is sleeping.

And what about Teddy The Guardian? The typical Teddy Bear crosses the line and becomes smarter. Just by touching or holding its paw, which holds sensors, enables parents to measure their child’s vitals and see it using the app. Your child’s first best friend will be more than a mere toy, it will be an IoT device to also play with.

Teddy the Guardian

Teddy the Guardian

Owlet describes itself as an Smart Sock that monitors your baby’s vitals. Owlet alerts parents if their baby’s heart rate and oxygen levels are outside the norm. Alerts are sent to a primary alarm (with a green and red light sensor) and your smartphone too, allowing you to know everything about your baby in real-time.

Owlet

Owlet

On the band side, we find products such as Sproutling, which will fit around your baby’s ankle. It includes a sensor that measures heart rate, skin temperature, motion and position, and sends all the information to your smartphone.

While these devices track a lot of variables, there are some that can be used just for one specifically. TempTraq is described as the first and only 24-hour intelligent thermometer that senses, records, and sends alerts of your children’s temperature to your smartphone. It is a patch, so it is both soft and flexible, which will make your baby feel more comfortable. Parents can receive information from more than just one child, as the app makes it possible to track information for multiple children.

And what about filming your baby? The webcam located strategically to spy on the babysitter will be left behind with the arrival of devices such as Withings Home, which places a 135º camera inside to record both night and day events. When you are not at home, you are able to see what happens to your baby, but also in your house too. It includes infrared LEDs to guarantee a high quality night vision, as well as noise (for example when the baby is crying out loud) and motion sensors. The device also tracks indoor air pollution to make sure your family lives in a well-being environment. To sum up, Withings Home is not only used for babies, but for all the members of the family.

Do not miss any event with Onni Smart Care Baby Monitor. In this case, it designed specially to film the baby and be able to watch how is he/she is in real-time. Onni places a camera, infrared, microphone, speaker, night light and temperature sensor. Parents are alerted when the baby wakes up, if there’s any loud noise in the child’s room, or if the room temperature is too hot or too cold, the advice is sent directly to their smartphones. By using Onni, parents can also keep track of the child’s growth, turning this device into a must have in the baby things collection.

Eat Well, Grow Well

It is said that we are what we eat, so you should start since you are a baby. That is the reasoning of most parents in the world. Milk Nanny is a connected baby’s milk maker. The app tells you when the machine is ready to operate and also statistics about the milk (quantity of water, temperature…).

Milk Nanny

Milk Nanny

As if we have the Hapi Fork (a tracker fork), here comes the Baby Glgl for babies. This is a baby’s bottle that allow parents know when the baby is eating correctly thanks to some sensors that places inside.

More IoT Things To Think About

We have talked about several baby trackers, of all shapes and sizes, and also about the eating devices you should have in your house if you are planning to have a baby. But, what about the daily and simple things such as pacifiers or diapers? Both things, are also a must have when you have a baby. Luckily, the IoT companies have designed some connected options of these objects.

Pacif-i, from Blue Maestro, is a pacifier that monitors a baby’s temperature and transmits the data to his/her parents smartphone or tablet. It is composed of a temperature sensor inside its silicon teat and a proximity sensor that allows parents to monitor its location. It is really useful to record the medication that is administered to the baby, so it is easier to share the data with medical professionals.

On the other side, we have the Smart Diapers, which started a crowdfunding campaign in Kick-Starter and that pretended to monitor the baby’s health. It would be used to detect urinary tract infection, prolonged dehydration and developing kidney problems.

To calm down a baby would have never been as easy as it will be with mamaRoo, from 4moms, a rocker to keep your baby calmed. You can choose the way you want it to move: up and down, from left to the right… The movement will be controlled by the app. But there is even more! Parents will be able to add music to their baby experience with the mamaRoo.

mamaRoo

mamaRoo

The Role of thethings.iO

At thethings.iO, we connect devices or wearables such as the ones we have mentioned in this post to the Internet. We are a Cloud solution for companies that decide to build new cool things that can be connected to improve our lives. If you want to know more about us, you can create an account by clicking here, sign up to receive our monthly newsletter or follow us on Twitter! Stay tuned and be the first in knowing the latest news of the IoT world and thethings.iO.