Connect esp8266 to the Internet at thethings.iO
The ESP8266 is a little board that can be used as an Arduino WiFi module using serial communication and AT commands. But since it features a processor, memory, GPIOs and much more, there are more interesting uses to it than a simple shield to connect your Arduino to the Internet. It can be used as a simple and minimal Arduino with integrated WiFi. And, of course, you can connect store data and interact with ESP8266 with thethings.iO

Flashing the ESP8266
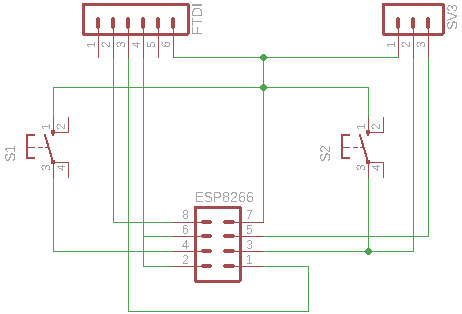
In order to flash the board with any of the mentioned firmwares, it must be powered on with GPIO0 set to LOW. Since this is something that is done so frequently (specially when debugging), an easy and convenient way to do it is to build a board with switches in it to ease the boot/reset process. It can even be designed to have all the needed GPIOs connected to female pins so we can prototype without having to attach/detach the board constantly.
Since there are so many versions of this chip, you’ll have to adapt this board to whichever model you are using.
As can be seen in the schematic, S1 is wired to GPIO0 and GND, S2 is wired to RST and GND. So, pressing S2 will reset the board while pressing both and releasing S2 first will put the chip in flash mode and allow us to program it via the FTDI232.
Firmwares for ESP8266
AT
The module usually ships with this firmware by default. It features a simple command prompt that allows you to connect the device to the internet with some simple commands (called AT Commands). Inside the zip file provided in the link above there is a reference manual that shows how simple is to communicate with the board.
This firmware is useful to use the board as a cheap Arduino WiFi shield since using it with the RX/TX pins or a SoftwareSerial instance is really simple. Just send the same commands that you would write by hand on the serial monitor through the SoftwareSerial and you’re ready to go. There are a couple examples in our repository that can help you get started with that.
Example
Using any serial comm program you can communicate with the board and check its version, connect to a WiFi spot…
> AT+RST
 OK
 > AT+GMR
 AT version:0.21.0.0
 SDK version:0.9.5
 OK
 > AT+CWMODE=1
 OK
 > AT+CWJAP="YOUR SSID","YOUR SSID PASSWORD"
 OK
NodeMCU
The easiest way to put custom programs in the chip is to flash it with this firmware and run lua scripts in it. This method is ideal to prototype IoT products fast and simple. Once you have flashed the firmware, you can access the lua command prompt with the serial programmer or upload your scripts with the luatool.
An easy way to get a custom build of this firmware with the modules you need is the online NodeMCU custom builds.
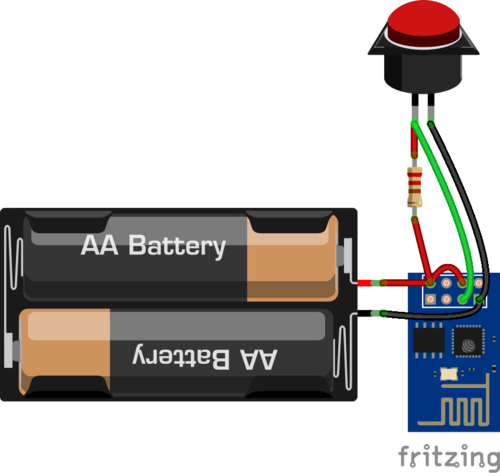
The following example uses MQTT to send a signal to the thethings.iO platform each time a button is pushed.
function init()
    -- Change these variables to suit your needs
    token = "YOUR THING TOKEN"
    ssid = "SSID"
    password = "SSID PASSWORD"

    server = "mqtt.thethings.io"
    button_pin = 4
    pushed = false

    gpio.mode(button_pin, gpio.INT)
    gpio.trig(button_pin, "low", checkButton)
end

-- Set the esp8266 as station an connect to desired WiFi
function connect(ssid, password)
    wifi.setmode(wifi.STATION)
    wifi.sta.config(ssid, password)
    wifi.sta.connect()
    tmr.alarm(0, 10000, 0, checkConnection)
end

-- Check the connection status, connect if disconnected and create the mqtt
-- client when connected
function checkConnection()
    if not wifi.sta.status() == 5 then
        print("Connecting...")
        connect(ssid, password)
    else
        print("Connected!")
        createMQTTClient()
    end
end

function createMQTTClient()
    m = mqtt.Client("esp8266Client", 120, "", "")

    m:on("offline", function(client)
        print("MQTT offline, reconnecting...")
        checkConnection()
    end)

    m:connect(server, 1883, 0, function(conn)
        print("MQTT connected")
    end)
end

function sendPushed()
    if not wifi.sta.status() == 5 then
        checkConnection()
        return
    end
    m:publish("v2/things/"..token, "{\"values\":[{\"key\":\"button\",\"value\":1}]}", 0, 0, function(client) print("sent") end)
end

function checkButton(level)
    if level == 0 and not pushed then
        print("PUSHED")
        pushed = true
        sendPushed()
    else
        if level == 1 and pushed then
            pushed = false
        end
    end
end

init()
checkConnection()
You can see the full source and other examples here
Arduino code for ESP8266
An easy to setup method that uses the same environment and libraries as Arduino. You can use our Arduino libraries (using the WiFi class) to easily connect it to the thethings.iO platform.
#include <ESP8266WiFi.h>

#define TOKEN "YOUR THING TOKEN"

#define SSID      "YOUR SSID"
#define PASS_SSID "YOUR SSID PASSWORD"

WiFiClient client;

void setup() {
    Serial.begin(9600);
}

void loop() {
    checkConnection();
    String string;
    while (client.available()) {
        string.concat((char)client.read());
    }
    string.toUpperCase();
    string.replace(" ", "");
    if (string.indexOf("\"VALUE\":1") > 0) {
        Serial.println("ON");
    }
    else if (string.indexOf("\"VALUE\":0") > 0) {
        Serial.println("OFF");
    }
}

void checkConnection() {
    if (WiFi.status() != WL_CONNECTED) {
        WiFi.begin(SSID, PASS_SSID);
        while (WiFi.status() != WL_CONNECTED) {
            Serial.print(".");
            delay(1000);
        }
    }
    if (!client.connected()) {
        if (client.connect("api.devices.thethings.io", 80)) {
            client.println("GET /v2/things/" + String(TOKEN) + " HTTP/1.1");
            client.println("Host: api.devices.thethings.io");
            client.println("Accept: application/json");
            client.println();
        }
    }
}
C language for ESP8266
You can write your own firmwares using the Espressif SDK. This is a more interesting usage for this board since it allows you to create custom programs that can read/write from the GPIOs, manage memory, use PWM, UART…
The easiest way to get started with this is to install the SDK from the esp-open-sdk project. After cloning and building it you’ll be able to use the xtensa-lx106 compiler to build your own applications. We’ve built a simple library that allows easy connection with thethings.iO
This function checks periodically if an IP is assigned until it is.
void ICACHE_FLASH_ATTR network_check_ip(void) {
    struct ip_info ipconfig;
    os_timer_disarm(&network_timer);
    wifi_get_ip_info(STATION_IF, &ipconfig);
    if (wifi_station_get_connect_status() == STATION_GOT_IP && ipconfig.ip.addr != 0) {
        os_printf("IP found\n");
        thethingsio_activate(ACTIVATION_CODE, get_token);
    } else {
        os_printf("No IP found\n");
        os_timer_disarm(&network_timer);
        os_timer_setfn(&network_timer, (os_timer_func_t *)network_check_ip, NULL);
        os_timer_arm(&network_timer, 1000, 0);
    }
}
This is the starting function for the user program (like setup() for Arduino)
void ICACHE_FLASH_ATTR user_init() {
    // Set AP settings
    char ssid[32] = SSID;
    char password[64] = SSID_PASSWORD;
    struct station_config config;
    os_memcpy(&config.ssid, ssid, 32);
    os_memcpy(&config.password, password, 64);

    // Configure wifi
    wifi_set_opmode(0x1);
    wifi_station_set_config(&config);

    network_init();
}
You can see the full source here