Using Geofencing with thethings.iO
What is geofencing?
Geofencing is a technology that allows you to create geographical boundaries and set up triggers based on location information.
For example, you could send a message to someone when a “thing” has entered or left a specific area defined by your geofence.
Some of the great uses of geofencing include location tracking, monitoring assets, alerts when assets enter/leave, monitoring turnaround time, and more!
Setting up geofences with thething.iO’s IoT platform
Creating geofences
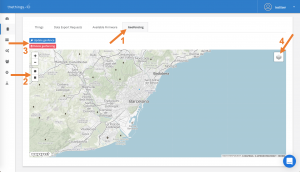
To create a geofence, go to “things” in the sidebar, then click on details next to one of your products (it does not matter what product, the geofence made under one will show up under the others). Then scroll down to the bottom of the page and (1)click the tab “Geofencing.”
Once there, you can (2)click either the polygon or the square to draw your geofence. If you choose polygon, remember to click the first point again to close the shape.
(3)If you select one of the shapes you have already drawn, you have the option to “update geofence” or “delete geofencing”.
(4)You also have the option to change the look of the map to best suit your needs.
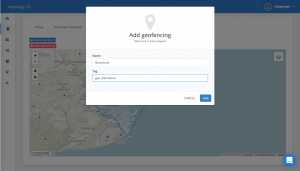
When you are finished drawing your geofence, you will be prompted to give it a Name and Tag. You can make the Name whatever you choose, but make sure the Tag is “geo_” followed by the location. For example, “geo_barcelona” (This format will make execution easier later).
Putting tags on a “thing”
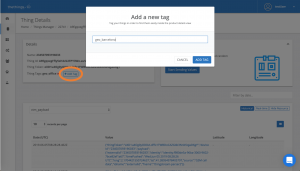
Now that you have a geofence, you will want to tag some of your “things” to that geofence. To do this, click back over to the (1)“things” tab, and (2)click details next to one of your things.
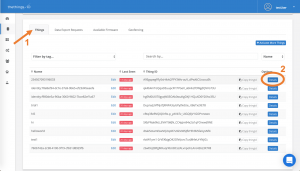
Next, click “+Add Tag”. Give this tag the same tag name as you gave to the geofence. For example, I will give this tag the name “geo_barcelona”, to tie this “thing” to my Barcelona geofence.
Making your geofences execute a Job
In order to use your new geofences, you will want to create a Job. Jobs are Javascript code that can be executed once every hour or once a day depending on what you set their Frequency to.
Creating a new Job
To create a new Job, go to “Cloud Code” in the sidebar, then find the section that says “Jobs” and click the “add job” button in the upper right. Give it a name, assign it to the correct product and set its frequency. Now, let’s talk about the code.
Understanding this Job
Here, I have provided an example and explanation of what your Job could look like to get your geofences working.
Overview: This Job goes through all of your “things” under a product and compares their “geo_” tags to the geofences you have made to check if your “thing” is inside/outside one or more geofences. If it is inside/outside one or more geofences, it will send an email to you saying what geofences your thing is inside/outside and it will update any widgets that are using the “alert_inside-outside” resource we will talk about later.
This Job has four functions: job, getGeofences, checkPosition, and checkInsiders.
job: Makes all your “things” under this product available to work with in the rest of the helper functions and calls the helper functions
getGeofences: Makes your geofences avaliable to work with
checkPosition: First, checks to see if a “thing’s” tag matches any of the geofences’ tags. For every match, it checks to see if the “thing” is inside/outisde that geofence. If so, it writes that to the geofencesInside/geofencesOutiside array, respectivaly. It does this for every “thing” under this product.
checkInsidersOutsiders: checks to see if a thing is inside/outside a geofence using the geofencesInside and geofencesOutside arrays you just created. If so, creates a resource that says what geofences the “thing” is inside/outside, and creates a strings of all the geofences a thing is inside/outside and sends this string in an email. It does this for every “thing” under this product.
function job(params, callback)
{
 async.waterfall([
    thethingsAPI.getProductThings,
    getGeofences,
    checkPosition,
    checkInsidersOutsiders
 ], function(err, res) {
    if (err) return callback(err);
    callback(null, res);
 });
}


function getGeofences(things, callback)
{
 async.eachLimit(things, 10, (thing, next) => {
    thethingsAPI.getGeofences(thing.thingToken, (err, geofences) => {
       if(err) return next();
       thing.geofences = geofences;
       next();
    });
 }, (err) => {
 callback(null, things);
 });
}


function checkPosition(things, callback)
{
 console.log("======== CHECK POSITION =========");

 async.eachLimit(things, 10, (thing, next) => {
    thing.geofencesInside = [];
    thing.geofencesOutside = [];

    if(!thing.hasOwnProperty('tags') || !thing.hasOwnProperty('geofences')) return next();
    if(!thing.description.hasOwnProperty('geo')) return next();
    for(let i=0; i<thing.tags.length; i++){
       if(thing.tags[i]._id.startsWith("geo_")) {
          for(let j=0; j<thing.geofences.length; j++){
             if(thing.tags[i]._id === thing.geofences[j].tag.toLowerCase()){
                if(geolib.isPointInside({latitude: thing.description.geo.lat, longitude: thing.description.geo.long}, thing.geofences[j].points)){
                   thing.geofencesInside.push(thing.geofences[j]);
                   console.log("INSIDE --> "+thing.geofences[j]);
                }
                else
                {
                   thing.geofencesOutside.push(thing.geofences[j]);
                   console.log("OUTSIDE --> "+thing.geofences[j]);
                }
             }
          }
       }
    }

    next();
 }, (err) => {
 callback(null, things);
 });
}


function checkInsidersOutsiders(things, callback)
{
 let resultInside = [];
 let resultOutside = [];

 console.log("##### CHECK INSIDERS & OUTSIDERS #####");

 async.eachLimit(things, 10, (thing, next) => {

    if (thing.geofencesInside.length > 0)
    {
    console.log("this thing is inside of a geofence");
       var txt_geofenceInside = "";
       for (let i=0; i<thing.geofencesInside.length; i++){
          if (txt_geofenceInside!= "") txt_geofenceInside +=", ";
          txt_geofenceInside += thing.geofencesInside[i].name;
       }
       thing.insideFences = txt_geofenceInside;

       console.log("WRITE RESOURCE");
       resultInside.push({
          key : 'alert_inside-outside',
          value : "Inside: "+txt_geofenceInside
       });
       thethingsAPI.thingWrite(thing.thingToken, { values: resultInside }, {lib:'panel'}, next);
    }


    if (thing.geofencesOutside.length > 0)
    {
       console.log("this thing is outside of a geofence");
       var txt_geofenceOutside = "";
       for (let i=0; i<thing.geofencesOutside.length; i++)
       {
          if (txt_geofenceOutside!= "") txt_geofenceOutside +=", ";
          txt_geofenceOutside += thing.geofencesOutside[i].name;
       }
       thing.outsideFences = txt_geofenceOutside;

       console.log("WRITE RESOURCE");
       resultOutside.push({
          key : 'alert_inside-outside',
          value : "Outside: "+txt_geofenceOutside
       });
       thethingsAPI.thingWrite(thing.thingToken, { values: resultOutside }, {lib:'panel'}, next);
    }

    if (txt_geofenceInside !== undefined || txt_geofenceOutside !== undefined) {
       console.log("thingToken: " + thing.thingToken + ", Inside: " + thing.insideFences + ", Outside: " + thing.outsideFences);
    }
 next();
 }, (err) => {
 callback(null, things);
 });
}
Testing your Job
If you want to run some tests manually, you can click on Developers in the sidebar>Developer’s Console. Now on the edit screen for your Job, scroll down and find the button “Preview“.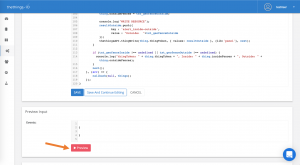
Click this, and all of your logs will show up in your Developer’s Console. You will also see new data on your geofencing widget in your Insight Dashboard which we will set up next.
Geofencing with your Dashboards
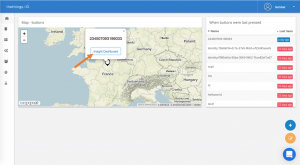
Your geofences will automatically show up on the maps in your main dashboard.
You can create a map by doing the following:
If you have an Insight Dashboard set up with your map widget, you can click on one of the “things” to get a closer look.
For more information on the magic of Insight Dashboards, check out this blog post.
Now, let’s make a widget on our Insight Dashboard that shows us where this “thing” has been.
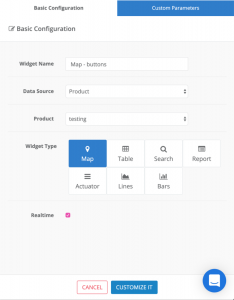
Once in the Insight Dashboard you wish to edit, click the add widget “+” icon, and do the following: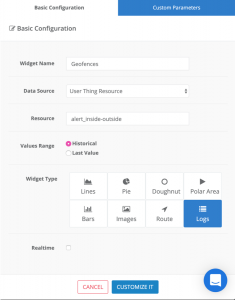
Note: you don’t need to click Realtime, because the widget will update automatically every hour or every day depending on what you set the Frequency to in your Job.
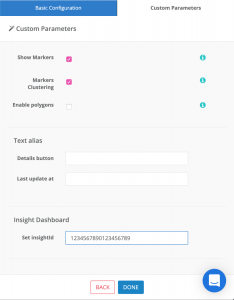
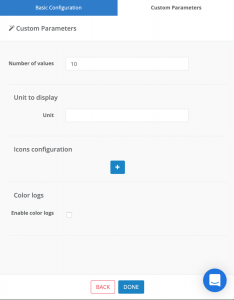
Under Custom Parameters, you may want to set a limit to the number of entries you will see in the widget. For example, I set mine to 10 values.
Don’t worry if the data looks odd; the data you see when editing an InsightDshboard is randomly generated because you are building a template.
Now save your Insight Dashboard and you are ready to use it!
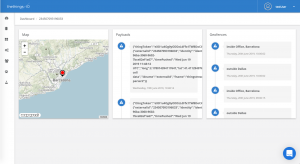
When on your Main Dashboard, click on one of the “things” in the widget connected to this Insight Dashboard and you should see the results of where this thing has been in terms of the geofences you connected it to.
I hope you enjoyed this tutorial! Feel free to contact us if you have any questions on thethings.iO IoT platform.
